How can I get my Davis data onto a 3rd party network?
How can I get my Davis data onto a 3rd party network? |
 | With a number of customers asking how to get their data from their Vantage Vue and Vantage Pro2's onto a 3rd party weather network. We thought we would cover
off how you can achieve this using a 3rd party piece of hardware (Meteobridge) with either Weatherlink or WeatherlinkIP. With this in mind we will cover off on what to do once you receive your recently purchased Meteobridge to get your Vue or Pro2 uploading to a 3rd party network. In this instance we will run through the steps of uploading your data to Wunderground. The first step when you receive your Meteobridge is to ensure it includes the following components: • TL-MR3020 Router – This will be flashed with the Meteobridge firmware • Ethernet Cable • USB cable and charger • Instruction manual | ||
|
Once you have ensured all components are there plug the Ethernet cable into the
Meteobridge and then into a spare port on your Broadband router. You will then need
to power the unit using the USB cable and charger. Your router will now automatically assign an IP
address to the
Meteobridge.
You will now need to find the Meteobridge on your network, if they are on the same network a solid green status light will show and it confirms it has a connection with the internet and you can now go about finding the IP address it is on. The simplest method to achieve this is by way of Magicip and you can do this by following the link below: http://magicip.meteobridge.com If prompted for a Username and Password enter the following: Username: meteobridge Password: meteobridge This will produce the following page showing you which IP address your Meteobridge is on: 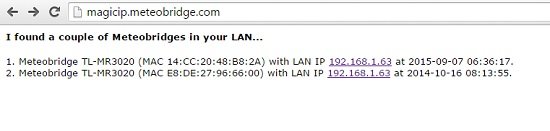 Figure 1: MagicIP revealing which IP address your
Meteobridge is on
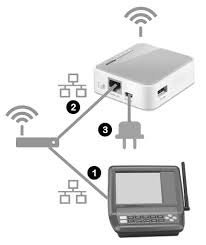
Username: meteobridge Password: meteobridge The next step is to connect your data logger, if you have the USB version it will need to be plugged into the console and then into the USB port of the Meteobridge. If you are using WeatherlinkIP there are two ways of connecting to the Meteobridge. The first is to connect the Ethernet cable from your WeatherlinkIP into your router and then the Ethernet cable from your Meteobridge to your router. Alternatively you could setup your Meteobridge to run on Wireless LAN. For the Meteobridge direct to Wireless LAN using WeatherlinkIP you will need to plug the console directly into the Ethernet port after setting up your Network settings within the Meteobridge interface (this is covered after the two images below): 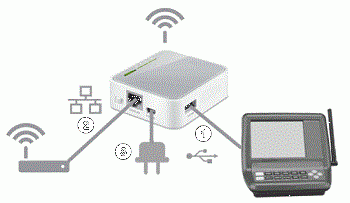  Figure 3:
WeatherlinkIP to router and console to router
From here you need to begin setting up your Meteobridge via the Web Interface, this is what you logged into previously. The first step is to setup your network connection. At Instrument Choice we decided on a Wireless LAN connection so that we didn’t have to have the console housed in the server room out of sight; however you can choose to run it on a LAN network if this is suitable for your requirements. Our “Type of Connection” setup is shown below: 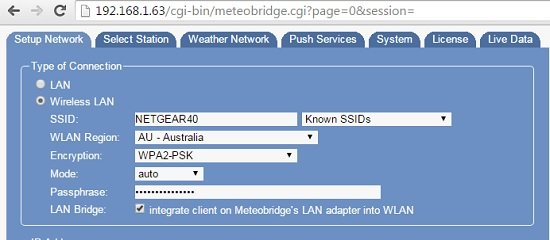 Figure 4: Network setup for WLAN
Under the “Select Station” tab you will need to select the station and type of Weatherlink hardware you are using. We used the Vantage Vue with Weatherlink for USB and this is reflected below: 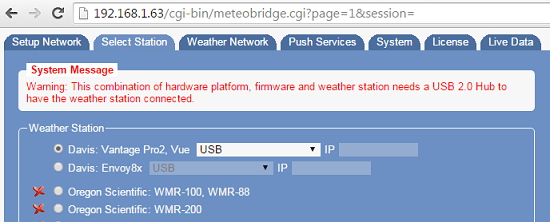 Figure 5: Station setup showing the
Vantage Vue with
Weatherlink USB selected
There is one final step in order to get your station onto a 3rd party Weather Network. As stated at the start of this article we put our station on Wunderground and in order to do this you will need to have a Wunderground account. Once you have this go into the “Weather Network” Tab in the Meteobridge setup menu. You can now input your Station ID and Password along with how often you wish to upload, our Weather Network settings are detailed below: 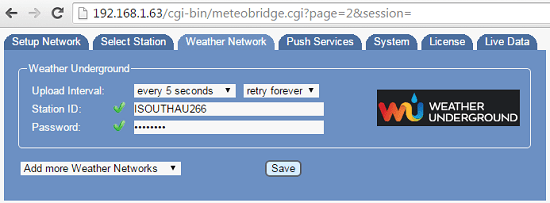 Figure 6: 3rd Party Weather Network settings to upload to Weather Undergroundmete
Once this is inputted and saved your data will now begin uploading to the 3rd party Weather Network. Our Wunderground station can be viewed here; http://www.wunderground.com/personal-weather-station/dashboard?ID=ISOUTHAU266 If you would like to discuss getting your Vantage Vue or Vantage Pro2 onto a 3rd party Weather Network or would like to discuss our weather station options please feel free to contact one of our friendly Scientists via email or phone on 1300 737 871. By Daniel McGaffin | |||
See our other newsletter articles here!
Contact our expert scientists now to get the right meter or data logger to suit your needs and discuss your project.
Phone: 1300 737 871
Email: [email protected]