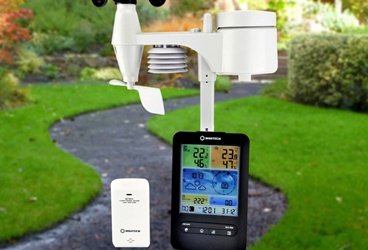
How to Connect the IC-XC0436 Wireless Digital Weather Station to WiFi and WeatherUnderground

The IC-XC0436 Wireless Digital Weather Station is a budget-friendly, WiFi weather station which connects to the third-party weather sites WeatherUnderground and Weather Cloud. Once connected to either of these third-party platforms, you can log in and view your hyperlocal weather data from anywhere.
So, if you already have, or are looking to purchase an IC-XC0436 digital weather station, read these step-by-step instructions to see just how straightforward the process is.
Figure 1 Watch an Instrument Choice scientist demonstrate how to connect the IC-XC0436 Wireless Digital Weather Station to WiFi and WeatherUnderground here.
How to Connect the IC-XC0436 Wireless Digital Weather Station to WiFi and WeatherUnderground
To complete your connection to WiFi and WeatherUnderground, your IC-XC0436 Wireless Digital Weather Station should be powered up and communicating with the indoor console. If you are unsure how to do this, see our video article “How to Setup the IC-XC0436 Wireless Digital Weather Station with Colourful LCD Display and WiFi”.
Generate a Station ID and Key on WeatherUnderground
- Open a web browser and navigate to https://www.wunderground.com/.
- If it is your first time using this platform, you will need to create an account. To do this, click “Join.” Then enter your email and follow the prompts to sign up for free.
- Once sign up is complete or if you are an existing user, go to “Log in” and enter your email and password, then click “Sign In.”
- Click “My Profile” in the top right corner.
- Select “My Devices” from the drop-down box.
- On the new page, click “Add New Device”.
- Under “Personal Weather Station”, click the drop-down box and scroll to the bottom. Select “Other”.
- Click “Next”.
- Enter your device location. You can either enter an address manually or find it on the map.
- Once a location is selected, click “Next.”
- On the new page, complete the requested information. Including:
- Name: Enter a name for your device.
- Ground Surface: Select a ground surface type for your station from the drop-down box (optional).
- Elevation: Enter the elevation of your station. This information is usually prefilled based on the entered address. If not, you can find this information through google maps.
- Webcam: If you have a webcam set up, select it from the drop-down box.
- Device Hardware: This information was selected in step 7, but can be adjusted if required.
- Weather Station Height: Enter the weather stations above ground for the station (optional).
- Accept the privacy terms and click “Next”.
- Your PWS Station ID and Station Key will generate automatically. Write these down or keep this webpage open. You will need these credentials for your station connection.
WiFi and WeatherUnderground Connection
- Power off your indoor console.
- Press and hold the “SENSOR/WIFI” button on the back and power the console up. You will need to hold the “SENSOR/WIFI” for around 6 seconds or until the LCD shows both “AP” and the WIFI icon blinking on the screen. This messaging indicates that the unit is in access point mode and is ready for a WIFI connection.
- Back on your computer (or phone browser), connect to the indoor console To do this, go to your WiFi network settings and find the WIFI signal emitted from the console. Look for PWS - XXXXXX.
- Select the WIFI and click connect. It may take several seconds for the connection to establish.
- Once connected, it is normal to receive a “No Internet” warning. Ignore this.
- Once connected, open a new browser and type http://192.168.1.1 into the search bar. If your browser treats your entry as a web search type in the full address (i.e. including http://).
- On this page, you can set up the server connection. The following information is requested;
- Enter your router – that is your home or work WIFI you choose for your station’s connection. If your WIFI does not appear on the drop-down list, click “Search.”
- Enter your WIFI password.
- Ensure the check box next to “WeatherUnderground” is selected. Then Enter the station ID and KEY that you created earlier. If you are only setting up WeatherUnderground (as we are in this example) ensure you deselect the box next to “Weather Cloud”.
- Scroll to the bottom of the page and click “Apply”. The screen will display “Setup Complete”.
IC TIP: A common issue when setting up Weather Underground is confusion between the letter ‘ O’ and number ‘0’ (zero) and the letter ‘I’ and number ‘1’ (one) with the station ID and Key. Where possible, copy and paste the digits across. - Returning to the indoor console, we can see the WIFI symbol remains and is no longer blinking. The appearance of this symbol signifies the successful connection of your console to your WIFI router.
- Allow a few minutes to elapse to allow for the device to upload data. Return to WeatherUnderground and navigate to “My Profile” then select “My Devices” from the drop-down menu.
- Your newly setup IC-XC0436 Digital Weather Station should appear with:
- The device’s “Name”
- “Location”
- “Status”
- “ID”
- “Key”
- “Type”; and
- “Management Options”.
- Clicking on the name of the device takes you to the station summary and data view. See Figure 1 (below) for an example of WeatherUnderground data readout.

Figure 1 Data readout for the IC-XC0436 on Weather Underground
IC TIP: The first time you enter the Station Summary, your results may be in imperial measurements. To set this to metric, go to the settings icon in the top right and click the “ °C ”. - Congratulations! You have successfully connected your Weather station to your WiFi and WeatherUnderground.
Conclusion
Smart weather stations don’t need to be complicated. Well designed weather stations - like the IC-XC0436 - allow you to connect your digital weather station to WiFi and WeatherUnderground in under ten minutes. Follow our instructions above, and it’s simple.
If you would like more information or having difficulty with your station, see the helpful links below or contact us!
Additional links
- View the IC-XC0436 Digital Weather Station here
- Watch "How to Connect the IC-XC0436 Wireless Digital Weather Station to WiFi and WeatherUnderground"
- Create a WeatherUnderground account here.
- After connecting, follow this link to the console WiFi: http://192.168.1.1
- After some setup help and tips? Watch an Instrument Choice scientist demonstrate “How to Setup the IC-XC0436 Wireless Digital Weather Station with Colourful LCD Display and WiFi
Want to see what comes in the box? Watch an Instrument Choice Scientist "Unboxing the IC-XC0436 Wireless Digital Weather Station with Colourful LCD Display and WiFi".

Also interesting
A caliper is a well-known and relatively commonplace instrument. But what is a Digital Vernier Caliper? This article explains what these instruments are, how they work and provides some excellent product examples.
Discover everything you need to know about digital vernier calipers here

The Instrument Choice Scientists regularly demonstrate how to set up some of your most popular products. In this edition, we explain how to set up the Hobo Data Logger UX100-003.
The Hobo Data Logger UX100-003, a temperature and humidity data logger with a high memory capacity, precision accuracy (within 3.5%), and an easy to read LCD. The UX100-003 is well-suited for almost any indoor monitoring application.
Learn the best way to set up your new UX100-003 and start logging data

