How to Get Your Weather Station Ready for Spring

After battling a winter of heavy rainfall, wild winds and some bitter cold, your home weather station might be a little worse for wear. Our scientists recommend that now is an excellent time to treat your home weather station to some spring cleaning to prolong its operational life and ensure reliable weather measurements and forecasts throughout the warmer months.
We have compiled this quick and easy checklist to guide you through your station’s spring clean.
Why Maintain Your Station?
Tracking the weather, learning about your local weather patterns and being prepared for any changes adds a wonderful dimension to anyone’s lifestyle. What’s more, climate change is creating another compelling reason to set up a home weather station at your home, business or farm.
Because the Australian outdoor environment is harsh, you need to maintain your sensor to measure your local weather accurately. Thankfully, with the tips provided below, it’s easy!
Your Spring Weather Station Maintenance Guide
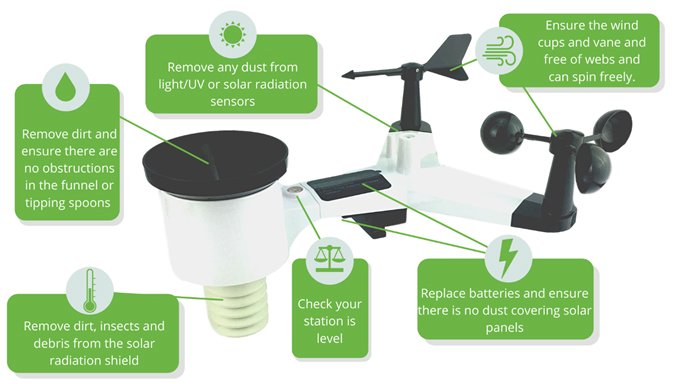
Weather stations can offer some or all of the sensors listed below. Follow the steps for the sensors on your unit for trouble-free weather monitoring in the months ahead!
Rain Gauge

The funnel of your rain gauge is entirely open to the rain. This design requirement makes it susceptible to collecting debris such as sticks, leaves, insects, and bird droppings – things that affect the accuracy of your rain gauge.
How to properly clean your rain gauge:
▢ Look for and remove any foreign items from the rain funnel. If your device has a debris filter, take it out and give it a good clean.
▢ Check your user manual for instructions on opening your rain gauge to remove any larger foreign objects.
▢ Carefully check for and remove any obstructions underneath the spoon.
▢ Use a damp cloth to wipe away any dust inside the rain spoon. (For best results, our scientists recommend cleaning your rain gauge several times per year).
Wind Vane and Wind Cups
Wind cups and wind vanes are used to measure wind speed and direction. A build-up of dust or grit on any moving parts or insect webbing within the cups reduces the mechanism's ability to move freely, impacting your wind recordings' reliability.

How to clean the wind vane:
▢ Use a cloth to remove any noticeable webbing, dirt, or grime from the vane.
▢ If you find the wind vane is particularly dirty, clean it with warm soapy detergent, then rinse well with water.
▢ Check annually that the orientation of the anemometer is correct.
How to clean the wind cups:
▢ Use a cloth to remove any noticeable webbing, dirt, or grime from the cups.
▢ If the wind cups are particularly dirty, check your station's guide for instructions on uninstalling and reinstalling the anemometer cups. Remove the cups and clean them with a warm soapy detergent.
▢ Rinse thoroughly and wait until dry, then reinstall the wind cups.

Radiation Shield, Relative Humidity & Temperature Sensors

Obstructions or the build-up of dust, insects, and grime on a radiation shield can affect temperature and humidity readings.
How to clean the radiation shield:
▢ Dust down the radiation shield using a cloth or a small soft toothbrush.
Unfortunately, insects love to make themselves at home within radiation shields. If you suspect you have critters in residence within your station’s shield, first check your user manual for instructions on shield removal.
How to clean the temperature/ humidity sensors and the radiation shield:
▢ Having removed the shield, use a soft cloth or small soft toothbrush to gently clean around the temperature and humidity sensor. Don’t use water.
- Unstack the solar radiation shield plates and remove any insects, webbing or debris you find stuck between the panels. Here you can use warm soapy water to clean thoroughly. Rinse and let the components dry completely before reinstalling.
Solar Radiation/UV/Light Sensor
Solar radiation, UV and light sensors can be obscured by built-up dust and grime. Check your solar radiation, UV and light sensors often; otherwise, you can’t rely on the accuracy or reliability of these sensors’ measurements.
How to clean solar radiation, UV and light sensors:
▢ Use a cloth to remove any dirt, dust, or debris accumulated over the lens or cover.
▢ After cleaning, ensure that the sensors are level.
Solar Panels
To prolong the life of your backup batteries, you need to get the most charge from your solar panels. To ensure optimal charging, keep them clean and free of dust, debris, and bird droppings.
How to clean solar panels:
▢ Use an antistatic or damp cloth to wipe away obstructive foreign material from the solar panel’s surface.
Bonus Tips
The maintenance steps our team has outlined above will address most issues. But wait, there’s more! Here are some tips you might find useful:
▢ Most stations will alert you in the event of a low battery – check to see if your station’s batteries require replacement.
▢ Is the spot you chose to mount your station still the best? New obstructions like growing tree branches, new buildings, or fences could impact your station's ability to collect or transmit weather information.
▢ Check your station’s mounting platform – it may have moved and is no longer level.
▢ Quickly check to ensure the mounting screws and all external sensors are adequately secured.
▢ Take and save some pictures of your weather station on your smartphone for future reference! If your station is mounted away from normal view, you might find yourself wondering, “Was that crack there last time I cleaned my station?” or “Did I forget to replace that bolt, or has it gone missing since the last clean?” Saved images are a quick and easy way you can know for sure.

The Final Word
With the weather slowly warming up, spring is the perfect time to give your home weather station a much-needed maintenance spa day. Weather station cleaning performed regularly is a straightforward task that will ensure accurate readings from your station's sensors while prolonging the life of your station - a win-win!
Need help with any of the spring cleaning steps listed above? Speak with an Instrument Choice Scientist – we’re weather station experts! Call 1300 737 871 or email [email protected].
Also interesting
The Instrument Choice Team of Scientists regularly reviews new and popular products, so you can make more informed decisions when searching for the perfect scientific instrument for your application.
This review details the PH210-K Laqua Water Quality Meter (pH/ORP) Kit, a handheld pH meter that comes with everything required for precision pH measurements for field or laboratory tasks.
Get our scientists’ review of the PH210-K Laqua Handheld Water Quality Meter Kit here

Straightforward, full of features, and shipped with everything needed for logging precision sound level measurements, the IC-SL4033SD Type 1 Sound Level Meter is perfect for professionals performing environmental sound level monitoring studies.
Get your IC-SL4033SD Type 1 Sound Level Meter and Data Logger setup guide here

