How to Set Up and Measure Wind Speed Using the WR-3 Plus Wireless Digital Anemometer Kit (WR3PKit)

The WR3PKit is a wireless digital anemometer with a robust handheld display unit that provides instantaneous and accurate wind speed, temperature and air pressure measurements. The sensor sends critical information to the handheld display up to 500 metres away and activates both an audible and visual alarm when user-defined parameters are beached.
Features are housed in a sturdy and robust digital anemometer package ideal for measuring wind speed for the building and industrial sectors - specifically, site monitoring and crane operations.
Figure 1 Watch an Instrument Choice Scientist demonstrate how to set up the WR-3 Plus Digital Anemometer Kit so you can measure wind speed accurately here.

Connecting the Sensors
Each sensor has a unique wireless address number pre-paired to a corresponding receiver display. The receiver instantly and automatically connects to the wireless sensor.
- Attach the antenna in the handheld receiver - twist to tighten.
- Install three AA Batteries in the handheld receiver as follows:
- Use a screwdriver to remove the compartment door.
- Install the batteries.
- Replace the battery compartment door and tighten the screw.
- Press the red POWER button to switch on the unit. Wait 2-3 seconds as the handheld receiver automatically connects to the wireless sensor. You can test the connection between the sensor and receiver by spinning the wind cups. If the link is successful, the handheld receiver will almost instantly update the wind speed measurement.
Settings Adjustment
Press the SETTINGS key to enter the settings menu. There are three options in the main settings menu, each with submenus. These are WIND SPEED, DATA LOGGING and GENERAL. Press the UP and DOWN arrow keys to adjust your selections and hit ENTER to move into the highlighted value.
WIND SPEED
There are three adjustment options in the WIND SPEED MENU.
- WIND SPEED UNIT
- Press ENTER when WIND SPEED UNIT is highlighted.
- Use the UP selection key to cycle through the options of m/s (default), km/hr, mph and knots.
- When your required value is displayed, press ENTER again to confirm, and the device will return to the main WIND SPEED submenu.
- Press the DOWN key once to navigate from WIND SPEED UNIT to ALARM.
- ALARM
- Press ENTER when ALARM is highlighted.
- Use the UP and DOWN keys to turn the wind alarm ON or OFF.
- When your required value is displayed, press ENTER again to confirm.
- Press the DOWN key once to navigate from ALARM to ALARM THRESHOLD.
- ALARM THRESHOLD
- Press ENTER when ALARM THRESHOLD is highlighted.
- Use the UP and DOWN arrows to adjust the alarm threshold value. The value can be adjusted from 1 to 180 in your selected wind speed unit.
- Press ENTER to confirm and return to the WIND SPEED submenu.
DATA LOGGING
There are three adjustment options within the DATA LOGGING submenu.
- LOGGING
- Press ENTER when LOGGING is highlighted.
- Use the UP and DOWN arrows to switch data logging ON or OFF.
- Press ENTER to confirm.
- Press the DOWN key once to navigate from LOGGING to LOGGING INTERVAL.
- LOGGING INTERVAL
- Press ENTER when LOGGING INTERVAL is highlighted.
- Use the UP and DOWN arrows to adjust the logging interval between 2 sec, 5 sec, 10 sec (default), 1 min, 5 min, 10 min or 60 min.
- Press ENTER to confirm.
- Press the DOWN key once to navigate from LOGGING INTERVAL to CLEAR DATA.
- CLEAR DATA
- To clear previously logged data, press ENTER when CLEAR DATA is highlighted.
GENERAL SETTINGS
There are six adjustment options in the SETTINGS submenu.
- DATE
- Press ENTER to adjust the date.
- Press UP or DOWN to adjust the highlighted unit, starting with the day.
- When the required value is displayed, press ENTER to confirm.
- Repeat to adjust the month and year. After changing the year, press ENTER a final time to return to the GENERAL SETTINGS submenu.
- Press the DOWN key once to navigate from DATE to TIME.
- TIME
- Press ENTER to adjust the time.
- Press UP or DOWN to adjust the highlighted unit, starting with the hour.
- When the required value is displayed, press ENTER to confirm.
- Repeat to adjust the minute then, press ENTER again to return to the GENERAL SETTINGS submenu.
- Press the DOWN key once to navigate from TIME to SENSOR ADDRESS.
- SENSOR ADDRESS
- To pair a different or new sensor to your handheld receiver, press the ENTER key when the SENSOR ADDRESS is highlighted.

Figure 2 The wind sensor's "AD" number can
be located on the sticker near the base. - Press the UP and DOWN buttons to change the number in coordination with the “AD” number on the sensor’s label.
- Press ENTER to confirm and return to the GENERAL SETTINGS submenu.
- Press the DOWN key once to navigate from SENSOR ADDRESS to TEMPERATURE UNIT.
- To pair a different or new sensor to your handheld receiver, press the ENTER key when the SENSOR ADDRESS is highlighted.
- TEMPERATURE UNIT
- Press ENTER when TEMPERATURE UNIT is highlighted.
- Use the UP and DOWN arrows to adjust the displayed temperature unit between Celsius and Fahrenheit.
- Press ENTER to confirm and return to the SETTINGS submenu.
- Press the DOWN key once to navigate from TEMPERATURE UNIT to ATMOSPHERIC PRESSURE UNIT.
- ATMOSPHERIC PRESSURE UNIT
- Press ENTER when ATMOSPHERIC PRESSURE UNIT is highlighted.
- Use the UP and DOWN arrows to adjust the displayed temperature unit between hPa (default), mmHg or bar.
- Press ENTER to confirm and return to the SETTINGS submenu.
- Press the DOWN key once to navigate from ATMOSPHERIC PRESSURE UNIT to DISPLAY AUTO OFF.
- DISPLAY AUTO-OFF
- Press ENTER when DISPLAY AUTO OFF is highlighted.
- Use the UP and DOWN arrows to adjust the displayed temperature unit between OFF (default, receiver remains on), 5 min, 10 min or 30 min.
- Press ENTER to confirm and return to the SETTINGS submenu.
- Press MENU to return to the home screen.
Data Logging And Computer Export
DATA LOGGING
Before downloading data from your WR3, you will first need to have some stored data.
- To set up for data logging, press SETTINGS to enter the main menu.
- Navigate to DATA LOGGING.
- Select LOGGING.
- Use the UP key to adjust the logging status to ON.
- The device will say START LOGGING YES/NO. Select YES. Data logging will commence.
STOP DATA LOGGING
You must stop data logging before you can download data.
- After collecting the required data, press SETTINGS to enter the main menu.
- Navigate to DATA LOGGING.
- Select LOGGING.
- Adjust to logging status to OFF.
COMPUTER EXPORT
If it is your first time exporting data from the WR3, you will need to download the FREE software.
- Download the WR3-PLUS Data Export Software. Go to https://scarlet-tech.com/download-file/.
- Select DOWNLOAD.
- When the download is complete, open the zipped file.
- Open WR3PRV5.exe.
- Connect the handheld receiver to your PC via a micro USB cable. A new USB drive will show up on your devices list, indicating the receiver is connected to your computer.
- Select the COM Port of your receiver, then press the “DOWNLOAD” button.
- Select or create a file for your logged information.
- Select the export file type between “xlsx” or “xls”.
- WR3PR will start exporting the logged files. The receiver will display “Data Downloading” during the downloading process.
- Wait for the “Finish” pop-up that indicates the data export is complete.
- Once finished, go to the file selected or created in step 7 and open the newly created excel file.
- You will see your WR3’s setup information, including the logging start time, logging interval, measurement units, sensor address, and sensor serial number, with a list of all logged information below, including date and time-stamped recordings of wind speed, temperature, and air pressure. (Figure 2)
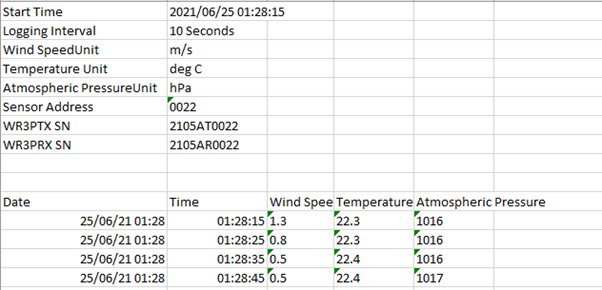
Figure 3 WR3 Data exported to excel with the date and time-stamped recordings of wind speed, temperature, and air pressure.
Conclusion
The WR-3 Plus Wireless Digital Anemometer Kit comes with everything required to take rapid wind speed, temperature and pressure measurements. The accuracy, wireless range, alarms and portability of the WR-3 kit make it the ideal wind speed monitoring tool for building sites and crane operations.
Want more information about the WR-3 Plus Wireless Digital Anemometer Kit? See the links below or contact us!
Additional links
- View the WR-3 Plus Wireless Digital Anemometer Kit
- Browse all Digital Anemometers here
- Watch “How To Measure Wind Speed Using The WR-3 Plus Wireless Digital Anemometer Kit (WR3PKit)”
- Want to see what comes with the WR-3 kit? Watch an Instrument Choice Scientist “Unboxing the WR-3 Plus Wireless Digital Anemometer Kit (WR3PKit)”

Also interesting
Kestrel Instruments designs and manufacture portable, accurate, and reliable weather measuring devices that encompass simple-to-use meters designed to aid everyday weather observations and professional, multi-parameter meters.
This article profiles an advanced and professional offering of Kestrel meters known as the Kestrel 5000 series.
Click here for the complete guide to the Kestrel 5000 series

Digital scales can have many valuable and practical applications around your home. Your Instrument Choice Team has prepared a list of the best digital scales priced under $499AU, featuring models suitable for:
- kitchen use
- weight management, and
- general use around the home.
We guarantee that in this list, you’ll find the perfect solution to your needs!
Check out our scientists’ carefully curated list of the best digital scales under $499 here
