How to Set Up and Take a pH Measurement on the IC860031 Benchtop Digital pH / MV Meter

The IC860031 Benchtop Digital pH / MV Meter is a professional, practical, and affordable digital benchtop pH and mV meter brimming with useful features and functions that make it ideal for laboratory use.
Figure 1 Watch an Instrument Choice Scientist demonstrate setting up the IC860031 Digital pH / MV Meter here.
How to Set Up the IC860031 Benchtop Digital pH / MV Meter
How to Assemble the IC860031 Digital pH Meter
- Install the electrode arm into the electrode base making sure it clicks into place.
- Plug the included power supply into the DC port on the back of the meter and a power supply.
- Select whether you would like the electrode arm on the left or right of the meter, then place the meter over the matching knob on the electrode arm.
- Plug the BNC connector and temperature jack into the back of the unit.
- Install the electrode into the holder. The excess cable can be threaded through two notches on the arm to keep to cables neat.
- Press the POWER/SET key to switch on the meter.
IC860031 Digital pH Meter Settings
The device settings mode allows you to customise meter preferences and defaults.
- To enter into settings, press and hold the SET key for two seconds.
Memory Transmission
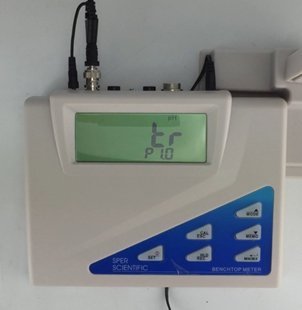
Figure 1 IC860031 Digital pH Meter menu screen P1.0
- The screen will display “tr”. This setting allows you to transfer stored data from the meter to a computer. To do this, you will need to connect an RS232 or USB cable to the back of the meter, connect the other end of the cable with your computer D-sub serial port and run the software from the CD included with this unit.
- When connected, press ENTER on the meter.
- OUT will flash on the device’s LCD, indicating the memory is transferring. Once complete, the LCD will return to “tr”.
Clear Memory
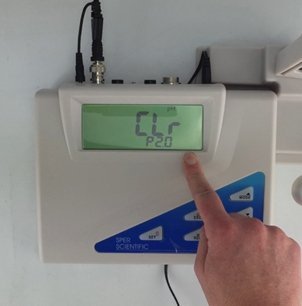
Figure 2 IC860031 Digital pH Meter menu screen P2.0
- To move onto the next memory option, press the UP selection key. “CLr” will appear on the LCD, indicating the CLEAR MEMORY function.
- To clear the device’s memory, ensure you are in the correct measurement mode for the parameter you wish to clear. To enter the CLEAR MEMORY function, press ENTER.
- NO will flash on the LCD. To clear the memory, press the up selection arrow until YES appears.
- Press ENTER. The memory will be cleared.
View Slope and Offset
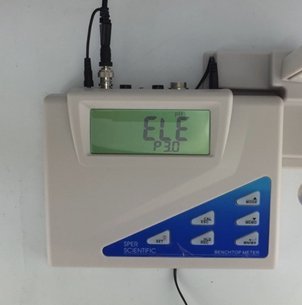
Figure 3 IC860031 Digital pH Meter menu screen P3.0
- Press the UP selector key to move onto the third settings option. “ELE” will appear on the LCD. You can scroll through four available slope values by pressing ENTER. The top display shows the value, and the bottom display shows the solution range. If any of the values (p3.1-p3.4) are less than 75% or above 115%, you will need to replace the electrode. Note: the solution range will differ between NIST and custom buffers. See table 1 (below)

Figure 4 Solution range for NIST and CUSTOM buffers on the IC860031 Digital ph/mV meter
- Pressing ENTER a 5th time displays the offset value. The offset value is the mV value of pH 7 (default 0.0). This value will be different after calibration. If the range is outside of ±60mV, replace the probe.
- Pressing the ENTER button a 6th time returns to the station of the electrode VIEW SLOPE and OFFSET setting.
Calibration Buffer Selection
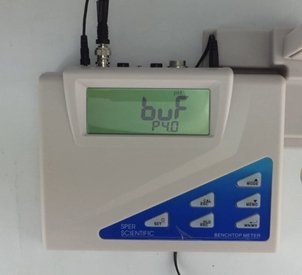
Figure 5 IC860031 Digital pH Meter menu screen P4.0
- Press the UP selector key to move onto the fourth settings option. The screen will display “BuF”. Press ENTER to adjust the BUFFER SETTINGS.
- Use the UP key to cycle between the two buffer set options:
- NIST: Automatic buffer recognition points in this group are pH 1.68, 4.01, 6.86, 9.18, and 12.45; and
- CUSTOM: This group has five different ranges. pH 1.00 to 3.00, 3.50 to 5.50, 6.00 to 8.00, 8.50 to 10.50 and 11.50 to 13.50.
- Press ENTER to make your selection.
Measurement Stabilisation Indicator
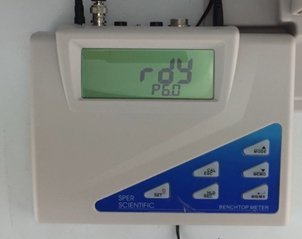
Figure 6 IC860031 Digital pH Meter menu screen P6.0
- Use the UP selection key to move onto the next settings option, and the screen will display “rdY”. Here you can switch on or off the READY measurement stabilisation icon.
- To adjust this, press ENTER.
- Use the UP key to choose between YES (on) or NO (off).
- Press ENTER to confirm your selection.
Temperature Unit Selection
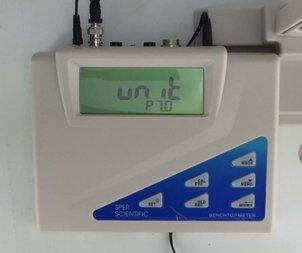
Figure 7 IC860031 Digital pH Meter menu screen P7.0
- Press the UP selector key to move on to the next menu option, and the LCD will display “unit”.
- To adjust the displayed TEMPERATURE UNIT, press ENTER.
- Use the arrow keys to choose between Celcius or Fahrenheit.
- When your desired unit is on the LCD, press ENTER to confirm.
Time and Date Setup
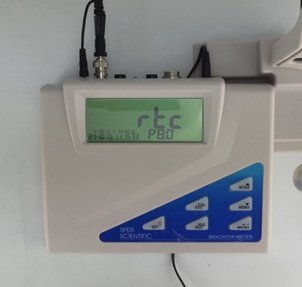
Figure 8 IC860031 Digital pH Meter menu screen P8.0
- Use the UP selection key to move onto the next settings option, and the screen will display “rtc”.
- Press ENTER to adjust the TIME AND DATE. The unit to be modified will blink on the LCD.
- Use the UP and DOWN arrows to adjust the blinking unit and ENTER to move to the next option. Repeat this step to adjust the:
- Year
- Month
- Day
- Hour
- Minute; and
- Second.
- After pressing ENTER for the adjustment of seconds, the device will return to the start of the time and date selection setup.
Factory Reset
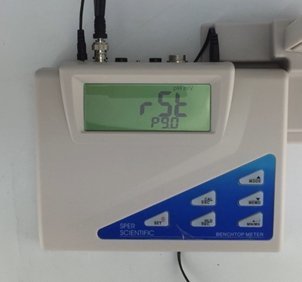
Figure 9 IC860031 Digital pH Meter menu screen P9.0
- Press the UP selector key to move onto the next and final option; the LCD will display “rst”. This display indicates the device’s FACTORY RESET setting.
- Press ENTER to enter the reset mode.
- NO will blink on the LCD. If you wish to reset the device, use the UP arrow key to navigate to YES and then press ENTER to confirm or to keep current settings, press ENTER when NO is displayed.
- Pressing the UP key a final time cycles you back to the start of the settings menu. If you are happy with your settings selection, exit the setup menu by pressing ESC. The device will return to measurement mode with your settings saved.
Taking a Measurement on the IC860031 Digital pH Meter
Basic pH Measurement
- Remove the storage cap from the electrode. To do this, rotate the bottom to remove the bottle from the probe, then remove the cover.
- Rinse the electrode in deionised or distilled water.
- Immerse the probe tip completely into your sample to be measured.
- Ensure that ATC is on the bottom of the LCD – this indicates that the automatic temperature compensation probe is connected and working correctly.
- When READY appears on the LCD, your measurement is stable and can be recorded.
Hold Function
- During a measurement, press the HOLD icon to freeze the pH reading on the LCD. HOLD, and the measured value will remain.
- Press HOLD a second time to exit HOLD mode and resume normal measuring mode.
Save Measurement to Memory
The device can also store up to 99 date and time-stamped records, and these will remain in the device memory even when the meter is powered off. To save a reading:
- In either measurement or HOLD mode, press the MEMO key.
- The memory number and measured value will flash on the LCD briefly before returning to normal mode.
How to Recall Saved Values
- Press the REC button for two seconds to enter into MEMORY RECALL mode. REC will blink on the LCD.
- Use the UP and DOWN arrows to move through each of the saved readings. For each reading, you will see the stored memory number, the pH measurement, and the temperature, along with the time and date these measurements occurred.
- To exit MEMORY RECALL mode, press REC a second time.
View Minimum and Maximum Recorded Measurements
- Navigate into MEMORY RECALL mode by pressing and holding REC for two seconds to view minimum and maximum records.
- Then press the MN/MX key one time to view the minimum recorded value of the saved readings.
- Press the MN/MX key a second time to view the maximum recorded value of the saved readings.
- To exit MEMORY RECALL mode, press and hold the REC button for two seconds.
Conclusion
The IC860031 is a professional and practical benchtop digital pH meter suitable for laboratory use bursting with useful features and functions to make measurement and data collection straightforward.
Need a hand with your IC860031 Benchtop pH/MV meter? See the links below or contact us!
Additional links
- View the IC860031 Benchtop Digital pH/MV meter here
- Watch “How to Set up and Take a Measurement on the IC860031 Benchtop Digital pH/MV meter”
- Learn “How to Calibrate the IC860031 Benchtop Digital pH/MV meter”
- Want to see what comes in the box with the IC860031 Benchtop Digital pH/MV meter? Watch an Instrument Choice Scientist “Unboxing the IC860031 Benchtop Digital pH/MV meter”.
Also interesting
Calibrating your IC860031 digital ph meter regularly and before taking measurements will ensure your device is working correctly. The IC860031 offers two calibration options:
- Automatic buffer recognition using National Institute of Standards and Technology (NIST) standard buffers; and
- Calibration using custom buffers.
The easy-to-use automatic custom buffers group is the most popular option for Australia because some of the NIST calibration points are not used in this country. For this reason, this guide details how you perform a two-point calibration on the IC860031 pH meter using custom buffers.
Learn how to calibrate the IC860031 digital pH meter correctly using the custom buffer selection

Despite their tricky name, anemometers are surprisingly common tools. If you are not absolutely sure what an anemometer is, then this article is for you!
Read the article and find out precisely “What Is an Anemometer”.
