How to Set up the IC0400WS Weather Station With Rain Gauge, Wind Speed And Direction

Weather stations are instruments with multiple sensors designed for collecting weather data in a specific location. Home weather stations increasingly popular for anyone wanting accurate localised weather information, including measurements you can obtain from your backyard.
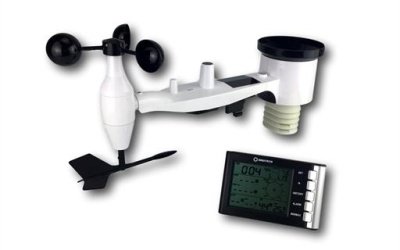
Instrument Choice features the IC0400WS weather station as a budget-friendly, and feature-packed tool that we guarantee will continuously deliver you precise, local weather information.
Figure 1 Watch an Instrument Choice scientist assemble the outdoor sensor and set up the indoor console on the IC0400WS here.
How to Set up the IC0400WS Weather Station With Rain Gauge, Wind Speed And Direction
Outdoor Sensor Assembly
- Mounting Hardware
- Slide the backing plate into place. Line the groove in the backing plate up with the plastic moulding.
- Install the two U-bolts into the metal plate.
- Loosely screw the nuts onto the ends of the bolts. You will tighten these later during the final mounting.
- Wind Cups
- Flip the unit over and push the wind speed cup assembly onto the shaft on the top side of the sensor suite.
- Use a small screwdriver to tighten the set screw.
- Give the wind cups a spin to make sure the cup assembly can rotate freely. There should be no noticeable friction when it is turning.
- Wind Vane
- Gently turn the station over.
- Push the wind vane onto the shaft on the bottom side of the station until it goes no further.
- Use a small screwdriver to tighten the set screw until you cannot remove the wind vane.
- Make sure the wind vane can rotate freely. The vane's movement has a small amount of friction; this is to ensure steady wind measurements.
- Batteries
- Use a screwdriver to open the battery compartment on the base of the unit.
- Insert the included AA batteries, observing their polarity.
- Once inserted, an LED indicator will turn on for four seconds and then flash once every 48 seconds indicating sensor data transmission.
- Replace the battery compartment cover and screw it into place.
Indoor Console Set Up
- Turn the unit over and open the battery cover door on the rear. The door simply unclips.
- Insert the included AA batteries and replace the battery cover door.
- All LCD segments will turn on for a few seconds.
- After this, the station will make initial measurements and start to register the transmitter. Do not touch any keys until outdoor sensor data is received, or the learning mode could terminate. When the outdoor transmitter has registered, the base station will automatically start updating with weather measurements.
Quick Display Overview
- In quick display mode, you can select which temperature parameters you wish to appear on the screen. Press the SET key to enter the quick display.
- Windspeed starts to flash. Press the + or MIN/MAX key to shift the display between wind speed and gust speed. Press SET to move on.
- Next is rainfall quantity. Press the + or MIN/MAX key to shift between the display of 1 hour, 24 hours, week, and month rainfall readings. Press SET to move on.
- Select between outdoor temperature, wind chill, and dew point. Press the + or MIN/MAX key to shift the display between each option. Press the SET key to accept and return to measurement mode
Settings Overview
- Press the SET key for two-seconds while on the home screen to enter setting mode. When in setting mode, the LCD digits will start flashing. Press MIN/MAX or '+' to adjust the settings and SET to confirm. Skip over segments without making adjustments, press SET.
- The first setting is the LCD lettering contrast. Select from 0-8. 0 is light, and 8 is dark. 5 is the default setting. Press MIN/MAX or '+' to adjust the parameters and SET to confirm.
- Next is time zone selection from -12 to +12. 0 for GMT +1, 1 for GMT +2 and so on. Press MIN/MAX or '+' to adjust and press SET to confirm.
- This screen is the selection between the time display in 12 or 24 hour time. Press MIN/MAX or '+' to adjust and press SET to confirm.
- Next is the manual time setting select hours first and then minutes. Press MIN/MAX or '+' to adjust and press SET to confirm.
- Select date and year format between DM or MD. Press MIN/MAX or '+' to adjust and press SET to confirm.
- The next three are calendar settings. Set the year, month then date. Press MIN/MAX or '+' to adjust and press SET to confirm.
- On this screen, select the wind speed and gust display units between km/hr, m/s, bft, mph, and knots. Press MIN/MAX or '+' to adjust and press SET to confirm.
- Set up the wind direction compass. Press MIN/MAX or '+' to adjust and press SET to confirm.
- Select the rainfall display units between mm or inches. Press MIN/MAX or '+' to adjust and press SET to confirm.
- Lastly, select your temperature scale between Celsius or Fahrenheit. Press MIN/MAX or '+' to adjust.
- Pressing SET again confirms and returns the screen to display measurement mode.
Alarm Settings Overview
- Press ALARM once to enter high alarm mode. HI AL on the top right of the LCD indicates the High Alarm setting mode.
- Press the 'SET' key to move between alarm modes, + or MIN/MAX to adjust alarm value and ALARM to turn alarms on or off.
- You can set a high alarm for time, wind speed, gust speed, wind direction, 1-hour rain high, 24-hour rainfall high, outdoor humidity, outdoor temperature, wind chill, dew point, indoor humidity, and indoor temperature.
- Update selections for each high alarm parameter. At the end of the selections, you will automatically return to measurement mode.
- To enter low alarm settings, press the ALARM button twice. LO AL will be on the top of the LCD.
- Press the SET key to move between alarm modes, + or MIN/MAX to adjust alarm value and ALARM to turn alarms on or off.
- Set low alarms for time, outdoor humidity, outdoor temperature, wind chill, dew point, indoor humidity, and indoor temperature.
- Update selections for each low alarm parameter. At the end of the choices, you will automatically return to measurement mode.
- The station is set up and ready for use.
Conclusion
The IC0400WS Weather Station is a budget-friendly station that is simple to set up and get started.
Contact us for more information on the IC0400WS weather station or browse the additional links below.
Additional links
- View the IC0400WS Weather Station Features and Specifications here.
- Want to know what comes in the box? Watch an Instrument Choice Scientist 'Unboxing the IC0400WS Weather Station With Rain Gauge, Wind Speed And Direction'
- Watch 'How to Set up the IC0400WS Weather Station' again.
- After more information on weather station terms? Read our article 'Weather Stations; How to Read Specifications'
Also interesting
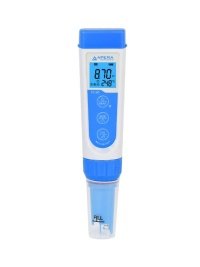
pH electrode probes are consumable items. Subject to your usage, Instrument Choice scientists recommend you replace your digital pH meter’s probe every 6-24 months. There are three tell-tale signs that it’s time to replace your electrode.

Soil pH can impact a plant’s uptake of nutrients. For healthy, vibrant plants and crops, it’s vital to check the pH of your soil. You can measure soil pH directly from the ground or via a soil slurry.
Measuring pH from a soil slurry is recommended when you have either:
1. A standard pH electrode incapable of penetrating the ground; or
2. Harder soil or soil that is high in debris such as sticks and stones.
To avoid inaccurate test results, and possibly, suboptimal soil nutrition, knowing how to prepare a soil slurry is essential.
This video article demonstrates the correct way to mix a soil slurry for soil pH measurement and the right way to operate your soil pH tester.

