How To Set Up The Kestrel 5500 Weather Meter

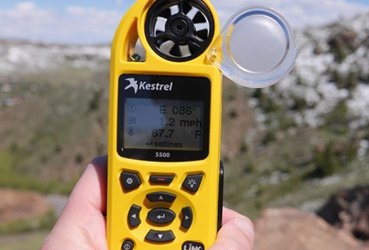
The Kestrel 5500 is a compact, handheld and rugged environmental meter and data logger featuring an assortment of unique functions, including a digital compass.
Figure 1 Watch an Instrument Choice scientist demonstrate how to set up the Kestrel 5500 weather meter here.
How to Setup the Kestrel 5500 Weather Meter
Getting Started
- Install the included battery. To do this, open the battery compartment using the battery door latch on the unit's base.
- Insert the included battery, observing polarity.
- Replace the battery compartment door. It will clip into place.

Figure 2 Kestrel 5500 function labels and functions
Button Functions
There are six buttons to help you navigate through the menus and options:
- Options/Exit
- Capture
- Backlight
- Up, Down, Left and Right navigation buttons
- Select/Enter; and
- Power ON/OFF.
Options Menu
- The Options button on any weather screen or the main targeting screen provides access to the options menu. Navigate through each option using the UP and DOWN arrow and change parameter settings using the LEFT or RIGHT keys.
- Data Port is the first setting you find. Here you can adjust settings for the data port. Use the UP and DOWN arrows to switch this on or off (if applicable).
- Memory Options: Next is “Memory Options…”. Any menu item with an ellipsis (…) has a sub-menu with further options. Navigate into the submenu by pressing the SELECT key. Under the memory options submenu, you can view and adjust:
- Memory used
- Turn on/off auto store
- Select a data store rate
- Turn on or off data overwrite; and
- Clear data logging.
- Graph Scale: Next is the graph scale sub-menu. For each measurement type, you can set high and low values to limit the display values.
- Display: The display submenu has options to:
- Set the automatic shutoff time (choose off, 15, 30, 45, 60 mins)
- Adjust contrast; and
- Select between a white or red backlight for the LCD.
- System: The system submenu has options for:
- Time and date adjustment
- Compass calibration
- Measurements: where you can choose which parameters you see on your display
- Unit: where you can adjust individual wind, temp and pressure measurement display units or select metric/ imperial measurement scales for all options under the global set menu
- Language adjustment
- Battery information
- Humidity calibration; and
- Factory reset.
- About: This submenu allows you to view the software version and legal information.
Navigating The Weather Mode Screens
- To navigate the weather mode screens, press the UP and DOWN selector keys to move through each measurement parameter.
How To Log MIN/AVG/MAX Data
- Navigate to your required parameter measurement screen.
- Use the LEFT or RIGHT arrow to cycle through additional data screens for that parameter. Navigate to the “MIN/AVG/MAX” screen.
- Press the SELECT button to start taking a measurement. As soon as select is pressed, the Kestrel 5500 will update the MIN/AVG/MAX values.
- When you have completed your reading, press SELECT to stop recording, and the final values will display.
- Press SELECT again to clear the values.
How To Graph Data
- Navigate to your required parameter measurement screen.
- Press the LEFT and RIGHT arrows to view additional screens. Navigate to the “Data” screen.
- Press the CAPTURE button to save the data. Each button press will add data to the graph.
- After you have graphed your points, press the SELECT key to move on to the data points screen. On this screen, you can view all information for each data point, including:
- The time and date
- The data point value; and
- The data scroll bar.
Setting Reference Values
To use your Kestrel to measure barometric pressure (i.e., station pressure adjusted for local elevation), you must enter a correct reference value for your altitude. For accurate barometric readings after entering this reference, no elevation changes can be made during measurements.
To use your Kestrel to measure altitude changes (i.e., changes in station pressure associated with elevation changes), you must enter a correct reference value for your starting barometric pressure. Accurate altitude readings rely on stable, weather-related barometric air pressure while measurements are taken.
Synchronised values between the Altitude and Barometer measurement screens allow reference value updates on either screen to automatically update reference values on the other.
How To Set Reference Values On The “Baro” Measurement Screen:
- Use the UP and DOWN arrows to scroll to the barometric pressure measurement screen.
- Press the SELECT key to enter settings.
- Navigate down to “Ref Alt”, then use the left or right selector keys to adjust the pressure value to a local, known value obtained from a mapping reference, GPS, or accurate weather station in the same location.
How To Set Reference Values On The Altitude Measurement Screen:
- Use the UP and DOWN arrows to scroll to the altitude measurement screen.
- Press the SELECT key to enter settings.
- Navigate down to “Ref Baro”, then use the left or right selector keys to adjust the pressure value to a local, known value obtained from a mapping reference, GPS, or accurate weather station in the same location.
Compass Calibration
- Press the OPTIONS to enter the options menu.
- Use the UP and DOWN keys to navigate to “System…”.
- Press SELECT.
- Use the UP and DOWN keys to navigate to “Compass Cal…”.
- Press SELECT.
- Place the base of the Kestrel on a flat surface at least 90cm away from any large metal objects.
- When in place, press the SELECT key to start the calibration.
- Rotate the Kestrel around its vertical axis three times, keeping the unit as vertical as possible and taking approximately 10 seconds per full rotation.
- The device will inform you when calibration is complete.
- The Kestrel 5500 is set up and ready to take measurements!
Conclusion
Straightforward to navigate and customisable, the Kestrel 5500 is a robust and convenient multi-parameter environmental monitoring and data logging tool.
For more information on the Kestrel 5500, see the links below or contact us!
Additional links
- View the Kestrel 5500 Weather Thermometer - IC-0855YEL
- View the Kestrel 5500 Weather Thermometer with LiNK and Vane Mount ic-0855LVYEL.
- There are several application-specific Kestrel 5500’s available. View them below:
- Browse the full range of Kestrel meters at Instrument Choice.
- Watch "How to Set Up the Kestrel 5500 Weather Thermometer"
- Want to see what comes in the box? Watch a scientist "Unboxing the Kestrel 5500 Weather Thermometer."
- Read the Instrument Choice article "4 Essential Tips for Accurate Measurements using Kestrel Handheld Products."

Also interesting
The Aqua-CPA is a robust and accurate all-in-one meter for measuring pH, conductivity, TDS, salinity and temperature. The device features an array of user-adjustable options so that you can tailor the multiparameter meter to suit your unique application.
Learn how to get set up to measure pH, conductivity, TDS, salinity and temperature on your AQUA-CPA here!

Multi-channel data loggers allow for simultaneous temperature monitoring of several points. Multi-point monitoring provides a comprehensive overview of overall temperature and facilitates temperature comparison calculations.
The Center521 is a Bluetooth-enabled data logger thermometer that supports K, J, E, T, N, R, S types of thermocouple probes. The Center521 has several user-configurable features and functions, making it a highly versatile temperature monitoring tool.

