How to Set up the MX1101 Temperature and Relative Humidity Data Logger on HOBO Mobile

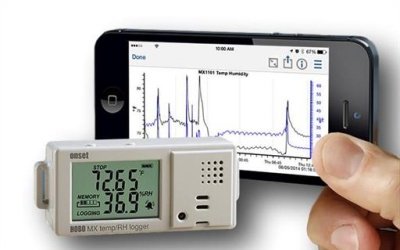
It's small but mighty! The MX1101 temperature and relative humidity data logger collects then transmits data wirelessly to mobile devices using Bluetooth smart technology. The logger is straightforward to deploy using the HOBOmobile app and features an array of user-selectable parameters that can be adjusted to suit individual needs and applications.
Figure 1 Watch an Instrument ChoiceScientist Setup the MX1101 Temperature and Relative Humidity Data Logger on HOBO Mobile here.
How to Set up the MX1101 Temperature and Relative Humidity Data Logger on HOBO Mobile
You will need;
- MX1101 Data Logger
- A smartphone or tablet with the following minimum system requirements;
-
- Bluetooth 4.X and up, and;
- iOS 11, 12 and 13, or;
- Android 7, 8, 9, and 10.
-
- Fit the included batteries into the compartment located on the back of the logger. The instrument will turn on automatically.
- Download the HOBOmobile application. (See the additional links below for links to the apps on Google Play and the App Store.)
- Once downloaded, open the app and ensure Bluetooth is turn on your mobile. Your phone will automatically begin to search for available HOBO data loggers.
- The logger's model name and serial number will appear on the screen. To connect, simply press the screen on the logger name.
- Once you have a successful connection established, the word 'connected' will appear at the top of the screen, along with a list of optional actions. Here you can; configure, download data, view status details, start logging, page, and set a password. After starting the logger, further options will become accessible.
- To get started, press 'configure.'
- The first block of selections is deployment information. Here you can;
- Set a name for your HOBO data logger
- Add the logger to a group
- Set a location using the map, and
- Give the unit a deployment number
- The next block of commands is the logging set up. Press the item you wish to adjust and make your selection. Here you can tailor;
- The logging interval and duration: Press, 'Logging interval,' or 'Logging duration' to adjust and make your selection.
- Configure how you want to start the logger: Find 'start logging,' then choose between
- 'now'
- 'on the next logging interval,' or
- 'at button push on a selected date and time.'
- Configure how to stop the logger: Under ‘stop logging,’ you can choose between;
- ‘stop logging’
- ‘when the memory is full,’ or
- ‘wrapping the logged data.’
- You can also select the method of stopping. Choose between;
- ‘button push’
- ‘never’
- ‘on a time/date,’ or
- ‘after a time/date.’
- The next selection is the alarm setup. The MX1101 allows you to set high and low alarms for temperature and humidity.
- For temperature alarms, press the ON/OFF button to turn the high and low temperature alarms ‘ON or OFF.’ If the temperature alarms are on, adjust the temperature using the sliding scale, or type-in the desired temperature.
- After selecting alarms and alarm temperatures, you can select when you would like to raise the alarm.
- Select the alarms for humidity in the same manner as temperature: Select ‘ON/OFF’ to turn the alarm high and low alarms on and off. When the alarm is on, adjust the threshold humidity percentage by using the slide scale or type in the desired level.
- After selecting alarms and humidity percentages, you can set when you would like to raise the alarm.
- Next, you can choose to turn the audible alarm on or off. If on, an alarming unit will beep once every 30 seconds. The beep will continue until;
- the alarm's removal from HOBOmobile
- a button is pressed on the logger, or
- after 7-days.
Note: Having the audible alarm setting on will slightly reduce the battery life of the HOBO data logger.
- The next block of commands allows you to select how long alarms will remain visible on the logger screen. Select between;
- ‘logger reconfigured’
- ‘sensor back within limits,’ or
- ‘alarm button pressed.’
- Finally, under the advanced block of settings, you can adjust the logging mode further as well as setting the LCD to remain ‘on’ or ‘off.’
- Once all your desired parameters are adjusted, press 'Start.'
- The current measurements will begin to appear on the logger as the unit has started to take temperature and humidity measurements according to the set parameters. You can now place your logger in its intended position.
Conclusion
The MX1101 temperature and humidity data logger is easy to set up and use. This wireless logger is self-contained and requires no additional dedicated equipment other than a compatible smartphone.
With an impressive range of up to 30-meters and an extensive choice of user-selectable measuring parameters, this logger is well-suited to anyone requiring temperature and humidity measurements sent directly to their mobile device when in range.
Want more information on the MX1101 or need a hand finding the best data logger for your needs? See the links below or contact us!
Additional links
- View the MX1101 Data logger product page, including full features, specifications, and how to purchase here.
- Browse HOBO data loggers available at Instrument Choice.
- Watch How to Set up the MX1101 Temperature and Relative Humidity Data Logger on HOBO Mobile again here.
- Want to see what comes in the box with the MX1101 HOBO data logger? Watch an Instrument Choice Scientist 'Unbox the MX1101 Temperature and Relative Humidity Data Logger'.
- Download HOBO mobile for Android devices
- Download HOBO mobile for IOS
Also interesting
Weather stations are instruments with multiple sensors designed for collecting weather data in a specific location. Home weather stations increasingly popular for anyone wanting accurate localised weather information, including measurements you can obtain from your backyard.
Instrument Choice features the IC0400WS weather station as a budget-friendly, and feature-packed tool that we guarantee will continuously deliver you precise, local weather information.

pH electrode probes are consumable items. Subject to your usage, Instrument Choice scientists recommend you replace your digital pH meter’s probe every 6-24 months. There are three tell-tale signs that it’s time to replace your electrode.

