How To Set Up The Oregon Scientific Wireless Rain Water Gauge (IC-RGR126N)

The Oregon Scientific Wireless Rain Water Gauge is a very popular rain gauge that features a separate temperature sensor. This rainwater gauge is the perfect tool for home users wanting accurate hyperlocal rainfall, historical rainfall and temperature information.
Figure 1 Watch an Instrument Choice scientist demonstrate how to set up the Oregon Scientific Wireless Rain Water Gauge (IC-RGR126N) here.
Materials
The contents of the RGR126 Wireless Rain Water Gauge kit. Including:
- Rain Water Gauge
- Indoor LCD console
- Indoor/outdoor temperature sensor; and
- Batteries (4 x AA, 2 x AAA).
Oregon Scientific Wireless Rain Water Gauge Set-Up Instructions
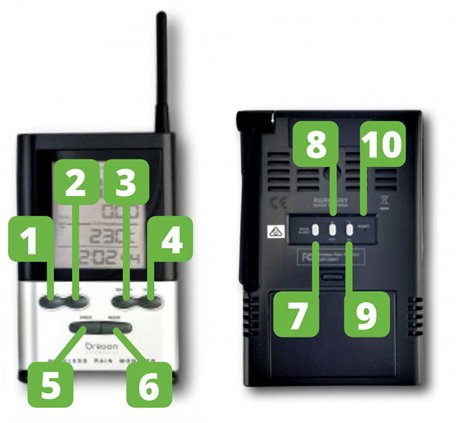
BUTTON FUNCTIONS

- UP: Press UP to navigate the menu.
- HIST: To display the record for a particular day, press the HIST key to cycle through the daily rainfall total and rainfall history over the past nine days. TODAY indicates the record for the current day. Records from previous days will be displayed with a minus sign at the top left-hand corner.
- SEARCH: Press and hold SEARCH to initiate a search for external sensors.
- DOWN: Press DOWN to navigate through menu settings.
- SINCE: To display the commencing date of the total rainfall record, press SINCE. The date the total measurement started will appear at the bottom of the display. Press and hold SINCE to reset the total rainfall to zero and begin a new data collection set.
- MODE: Press MODE to adjust the time, date and language manually.
- RAIN ALERT: This allows you to set up an audible and visual alarm for maximum daily rainfall.
- IN/MM: This toggles rainfall display between millimetres and inches.
- C/F: Toggles the temperature display between Celcius and Fahrenheit.
- RESET: Returns the unit to factory default settings.
BATTERIES AND SENSOR CONNECTION
Follow the sequence below when setting up the units.
- Set up the Indoor Console. Press the button above the battery compartment to open the door.
- Insert two AA batteries, observing the polarity.
- Replace the compartment door cover. The console will automatically switch on and begin searching for nearby devices. Device search mode is indicated by the reception status blinking on the LCD.
- Install the batteries into the Rain Water Gauge. Use a small screwdriver to remove the two screws located near the base of the unit.
- Pull the cover-up and off the base of the gauge.
- Unclip and open the battery compartment door located next to the tipping bucket mechanism.
- Insert two AA batteries, observing polarity.
- Wait – the indoor console will automatically connect to the Rain Water Gauge. When the Rain Water Gauge has connected to the indoor console, the digits on the first two lines will stop blinking and remain on the LCD. If the Rain Water Gauge does not automatically connect, press the SEARCH button on the console. This step will initiate a search for and then automatically connect the sensors.
- After the Rain Water Gauge is successfully connected, set up the Temperature Sensor.
- Slide off battery door cover from the temperature sensor.
- Insert the two AAA batteries, observing polarity.
- Replace the battery compartment door.
- Wait – the indoor console will automatically connect to the temperature sensor. When the Rain Water Gauge has connected to the temperature sensor, the digits on the first two lines will stop blinking and remain on the LCD. If the Rain Water Gauge does not automatically connect, press the SEARCH button on the console. This step will initiate a search for and then automatically connect the sensors.
HOW TO SET THE TIME AND DATE
- Press and hold MODE until the "24 HR" appears on the bottom of the LCD.
- The flashing digit on the LCD is the value to be adjusted. Use the UP and DOWN buttons to adjust the value of the digit, then press MODE to confirm. Adjustments options will appear in the following order:
- 12/24 hour time display
- Hour
- Minute
- Year
- Calendar display between D-M or M-D
- Month,
- Day; and
- Language.
- After running through and adjusting the eight options, press MODE a final time to return the device to the home screen, the settings will automatically save.

Figure 2 Rain Alert icon on the RGR126 Oregon Wireless Rain Gauge
HOW TO SET A RAIN ALERT
The Oregon Scientific Wireless Rain Water Gauge has a user-adjustable rain alert. Follow the steps below to adjust to your desired value. An audible alert will sound when rainfall is equal to or more than your set value.
The “Rain Alert” bell icon will flash continuously when the set value has been exceeded.
- Press and hold the RAIN ALERT button on the back of the unit to enter into setting mode.
- The rain alert icon and rain measurement value will begin to flash.
- Use the UP and DOWN buttons to adjust the rain alert value. Once your value is on the screen, press RAIN ALERT again to confirm.
- The small bell icon will appear and remain on the LCD.
- If the limit is breached and the alarm sounds, you can stop the alarm by pressing the RAIN ALERT button twice and wait for 8-seconds.
Conclusion
Straightforward to set up and maintain, the Oregon Scientific Wireless Rain Water Gauge is a highly popular Rain Water Gauge for home users wanting accurate hyperlocal rainfall and temperature information.
For more information on the RGR126 Wireless Rain Water Gauge, see the links below or contact us!
Additional links
- View the RGR126 Wireless Rain Water Gauge
- Browse all Rain Water Gauges here
- Watch "How To Set Up The Oregon Scientific Wireless Rain Water Gauge (IC-RGR126N)" again
- Want to see what comes in the box? Watch an Instrument Choice Scientist "Unboxing the Oregon Scientific RGR126 Wireless Rain Water Gauge (IC-RGR126N)".

Also interesting
The Wile-65 Moisture Sensor is a practical tool for the fast and accurate determination of moisture content in various grain and seeds. The unit has calibration curves pre-programmed for 16 Australian grains.
Learn how to take a sample, navigate the menu and take precise measurements with your Wile-65

Air quality is the sum of several characteristics that can affect a person's health and wellbeing. This article discusses how overall air quality is measured and highlights typical product examples, including notable features and applications.

