How to Set Up the Testo Smart Tools 405i Hot Wire Anemometer

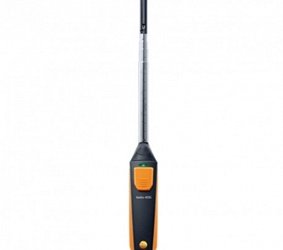
The Testo Smart Tools 405i Hot Wire Anemometer is a Bluetooth-enabled device controlled exclusively through your smartphone. The portable handheld unit accurately determines air velocity, temperature, indoor air velocity and volume flows - ideal for HVAC applications.
Figure 1 Watch an Instrument Choice Scientist demonstrate how to set up the Testo Smart Tools 405i Hot Wire Anemometer here.
How to Set Up the Testo Smart Tools 405i Hot Wire Anemometer
How to Connect the Testo Smart Tools 405i Hot Wire Anemometer to the Smart Tools App
- Download, install and open the Testo Smart application to your smartphone. This app is FREE, always up-to-date, compatible with all Bluetooth-enabled Testo measuring instruments, and is suitable for:
- Remove the battery saver tab from the anemometer.
- The LED light will flash yellow a couple of times, indicating the unit is on. The device will automatically search for a device will with the Testo Smart Tools app.
- When the LED on the anemometer begins to flash green, the probe has successfully connected to the application. The probe name, the current temperature and flow velocity will display on the LCD.
How to Take a Measurement With the Testo Smart Tools 405i Hot Wire Anemometer Using the Smart Tools App
- The app will automatically open in the BASIC VIEW measurement mode of your anemometer. To begin taking temperature and velocity measurements, press START.
- The record number and a recording timer will appear at the top of the screen and live readings will appear below.
- Once you have finished recording measurements, press STOP.
- Next, three options (below) will appear:
- Start a new measurement
- Resume the current measurement; and
- Save your collected readings.
- Pressing SAVE (i.e., option c above) if you want to keep the captured measurement and open a new screen where you can input further information. On the new screen, you can:
- See the date and time of the measurement
- Add and attach your customer’s information
- Attach any relevant images and comments
- View the reported velocity and temperature, along with details of the sensor that recorded the data (vital if you have multiple sensors); and
- The measuring period information, including; the start time, end time and duration.
- Press DISPLAY PROPERTIES on the SAVE screen to detail the parameters selected to obtain the measurement you are saving.
- Press SHOW VALUES on the SAVE screen to detail all the information for each recording and the overall average, minimum and maximum total.
- Finally, at the bottom of the SAVE screen, you can choose to export, generate a report or close off the screen.
Measure Mode Settings
Within the app, you can easily adjust a range of settings to suit the needs of your application. To adjust settings:
- When in measurement mode, navigate to the SETTINGS icon in the top right corner of the main screen.
- The options here will adjust depending on your measurement mode. In BASIC MODE, you can select:
- MEASURING MODE: Choose between continuous or multi-point
- START: Choose between manual or automatic. If automatic start is selected, you will need to input a start date and start time.
- RECORDING FINISH: Choose between manual or automatic. If automatic, you will need to set the duration of the measurement. Select the finish time in days, hours and minutes.
- MEASUREMENT CYCLE: Use the scroll screen to select the measuring cycle time in days, hours and minutes.
- After the settings have been configured, press ACCEPT CONFIGURATION on the bottom of the screen to save.
- The device will return to the measurement screen with your settings updated.
Main Menu Options
The three dashes on the top left-hand side indicate the in-app MAIN MENU. There are six sub-options in this menu.
- MEASURE: You can select your measuring mode from the list. Pressing on one of the measurement programs will bring up the MEASURE MODE SETTINGS for the specific program.
- CUSTOMER: In customer settings, you can input customer and measuring site information so that associated data can be saved and linked to your specific customer, so you won't need to re-enter it each time you take a measurement. Input the customer information and press SAVE.
- MEMORY: Within the memory menu, you can view, adjust and share all previously saved data. Your saved data will appear as a date and time arranged list and can be easily selected.
- SENSORS: Under sensors, you can view connected and recently connected sensors.
- SETTINGS: To adjust the settings listed below, press on the item and select the necessary parameter from the drop-down box. Here you can change:
- The language
- Measurement settings between metric or imperial
- Turn on or off user-defined measurement settings
- Adjust units of measurement for temperature, absolute humidity, pressure (air, refrigerator, evacuation and ambient), flow velocity and volume flow.
- Enter in your company information; and
- View and adjust privacy settings.
- HELP AND INFORMATION: The last option in the MAIN MENU is help and information about the Testo Smart Probes.
Conclusion
That's how simple it is to set up and navigate the Testo Smart Tools 405i Hot Wire Anemometer! You can now start taking air velocity, temperature, indoor air velocity, and volume flow measurements at air outlets and ventilation grilles. HVAC professionals love the Testo Smart Tools 405i Hot Wire Anemometer as it provides tremendous flexibility, so you can expect that your device will adapt to any unexpected measuring challenges you’ll encounter in everyday work.
Need a hand with your Testo Smart Tools 405i Hot Wire Anemometer? See the links below or contact us!
Additional links
- View the Testo Smart Tools 405i Hot Wire Anemometer here
- Browse all Testo Smart Tools and Smartphone Meters
- Get the Testo Smart Tools app for Android
- Get the Testo Smart Tools app for Apple devices
- Watch "How to Set Up the Testo 405i Smart Hot Wire Anemometer" again
Want to see what comes in the box? Watch "Unboxing the Testo 405i Smart Hot Wire Anemometer (IC-0560-1405)."
Also interesting
A major first-world Christmas challenge is finding the right gifts for our loved ones, particularly for any friend or family member with an affinity for gadgets.
Good news, we can help with that!
This year’s list of the best Christmas gifts at Instrument Choice varies from modestly priced stocking-stuffers to sophisticated widgets, all designed to delight someone who’s more scientifically minded.
So, spoil someone rotten this year with a gadget from the Instrument Choice Christmas tree! They’ll be delighted - we guarantee it!
Click to get “Your Guide to the Top 10 Gadget Picks for Christmas 2021.”

As more decorations appear in shops, it’s starting to feel like the “silly season” is here. If you’re stuck for gift ideas – this article is for you.
Weather stations make excellent and highly-practical gifts. So, whether you are looking for a gift for a parent, partner, friend (or yourself), we guarantee that you will find the perfect gift idea in our weather station guide.
See the best-performing instruments beginning from models under $A150, all the way up to professional models for weather enthusiasts.

