How to Setup the Carbon Dioxide (CO2) Meter - IC-CENTER512

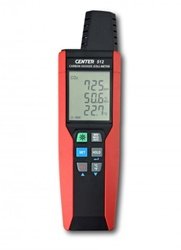
The IC-CENTER512 is an accurate carbon dioxide meter with a reliable dual wavelength NDIR (non-dispersive infrared) sensor. This CO2 meter offers data logging up to 32000 points, adjustable alarms, data hold, plus maximum, minimum, short term exposure and time-weighted average functions all on an easy-to-navigate unit.
Figure 1 Watch an Instrument Choice scientist demonstrate how to set up the Carbon Dioxide (CO2) Meter - IC-CENTER512 here.
How to Setup the Carbon Dioxide (CO2) Meter - IC-CENTER512
Backlight
- Press and release the POWER button to switch on or off the backlight. Note: the backlight will automatically turn off after 30-seconds to save battery.
View Minimum, Maximum and Average Data
In MIN/MAX/AVG mode, the CO2 meter simultaneously monitors and stores the minimum, maximum, and average values. The unit will continuously update and refresh data on the screen.
- To display the minimum recorded data, press the “MIN/MAX/AVG” button once. Press “MIN” and the lowest reading will display on the LCD.
- To display the maximum recorded data, press the “MIN/MAX/AVG” button a second time. “MAX” and the maximum readings will display on the LCD.
- Press the “MIN/MAX/AVG” button a third time and “STEL” displays on the LCD. If selected, this command will show the time-weighted average of data collected from a 15-minute exposure. The metric updates at 1-minute intervals.
- Pressing the “MIN/MAX/AVG” button a fourth-time displays “TWA” on the screen. If selected, this function will reveal the time-weighted average of data collected from an 8-hour exposure. The TWA CO2 reading updates at 10-minute intervals.
- A fifth pressing makes “MAX, MIN, STEL and TWA” flash on the screen to display real-time data. To exit the MIN/MAX/AVG mode, press the” MIN/MAX/AVG” button for two seconds. The device will return to normal measurement mode.
Setup Menu
Within the settings menu, press the “REC” button to scroll up, the “C/F” button to scroll down and the “HOLD” button to save changes and move onto the next option. Press “SET” again at any time to exit the settings menu.
- Press the “SET” button to enter into setup options.
- The first option “int” on the LCD is to set the interval time for data storing. Select from 1 second up to 60 minutes and 59 seconds. Use the “REC” and “C/F” buttons to adjust the interval then press “HOLD” to confirm and move onto the next setup option.
- Select “OFS” to adjust the offset to compensate for measurement errors. Use the “REC” and “C/F” buttons to adjust the offset then press “HOLD” to confirm and move onto the next option. This function allows you to offset the following errors:
- Humidity ( ±10%)
- Temperature (±5°C); and
- Carbon dioxide (±400ppm).
- When “Alt” appears on the screen, you can adjust IC-CENTER512’s sensors for your current altitude as follows - find your altitude using Google maps and use the “REC” and “C/F” buttons to adjust each digit and “HOLD” to confirm then move onto the next setup option.
- Next is the “Alarm Point” setting. Use the arrows to turn the alarm on or off. When the alarm is activated, two further options become available. Use “REC” and “C/F” buttons to adjust the high and low alarm levels then press “HOLD” to confirm and move onto the next setup option. You can also set the value for high and low CO2 alarms in the same manner.
- Next is the “Auto Power Off” setting, which defaults to “ON” with an automatic 10-minute switch-off time. Use the arrows to adjust - select between “OFF” (device remains on), “10 minutes”, “30 minutes”, or “1, 2, 4, or 8” hours. Use the “REC” and “C/F” buttons to set the “Auto Power Off” time and “HOLD” to confirm and move onto the next setup option.
- The last setting is the “Date and Time”. Set the “year, month, day, hour and minute” using the “REC” and “C/F” buttons to adjust each digit and the “HOLD” button to confirm.
- After the last digit for time and date is set and “HOLD” is pressed to confirm, the device will return to the beginning of the setup menu and display “Int”. To exit the menu and return to measurement mode, press the “SET” button.
Hold Function
- During a measurement, press the “HOLD” button at any time to freeze the current “CO2, temperature and humidity” readings on the screen. “HOLD” mode is indicated when digits freeze and “HOLD” is displayed on the LCD.
- Release the “HOLD” function by returning to measurement mode and pressing the “HOLD” button a second time.
Data Record Function
- Press the “REC” button to begin data recording. “REC” will appear on the screen during data is recording (at your pre-selected intervals).
- To stop recording, press “REC” again.
Data Recording Tips
Scientists’ Tip #1: You cannot enter the settings mode while data is recording. Check all settings before you begin recording.
Scientists’ Tip #2: When data memory is full (after 32,000 measurements), “FULL” will blink on the LCD. The logger will stop recording data when full.
Scientists’ Tip #3: Data logging is not possible if your device’s battery is running low (shown by the battery status indicator on the bottom left of the LCD). At critically low power levels, data logging will stop.
How to Clear Data Records
- Start with the CO2 meter off.
- Press and hold the “REC” button then press and hold the power button.
- Continue to hold both buttons. The unit will show “REC, CLr and SURE” at the top half of the LCD and a countdown starting from 5 will appear on the bottom half of the screen.
- After the countdown, the total number of available log points will display, if the display shows “32,000”, your reset was successful.
- Release the “Power” and “REC” buttons after clearing data records.
Change Temperature View
- When in normal measurement mode, press the “C/F” button to change the temperature display between Celcius and Fahrenheit.
Conclusion
The IC-CENTER512 is a simple to navigate, accurate and reliable data logging CO2 meter.
For more information on this meter, see the links below or contact us!
Additional links
- View the Carbon Dioxide CO2 Meter (NDIR) - IC-CENTER512 here
- Watch "How to Setup the Carbon Dioxide CO2 Meter (NDIR) (IC-CENTER512)"
- Want to see what comes in the box? Watch an Instrument Choice Scientist "Unboxing the Carbon Dioxide CO2 Meter (NDIR) (IC-CENTER512)"
Also interesting
A multifunction environment meter is a scientific instrument that allows a user to measure a host of parameters without the need to swap meters or have multiple units. These devices are popular with professionals or students who spend a lot of time working in the field. In roles such as engineers, field technicians and researchers.

Instrument Choice supports universities, scientific research organisations and pharmaceutical companies with a range of essential laboratory equipment. The Instrument Choice Team comprises scientists with plenty of laboratory experience, so if you’re ever thinking of setting up a new lab or refurbishing an old one, give us a call before you start. To help you get started we have made a list of the top 5 pieces of laboratory equipment every lab must have.


