How to Setup the Testo Saveris 2 - T1 Single Channel Wireless Data Logger

The Testo Saveris 2 – T1 Single Channel Wireless Data Logger is a flexible, reliable and straightforward solution for monitoring and measuring ambient temperature. The logger has a built-in temperature sensor and relays collected temperature information to the Testo Cloud via WIFI.
The Testo Saveris 2 – T1 is ideal for the long term monitoring of ambient temperature in warehouses, buildings, server rooms and offices.
Figure 1 Watch an Instrument Choice scientist demonstrate how to set up the Testo Saveris 2 – T1 Single Channel Wireless Data Logger here.
How to Setup the Testo Saveris 2 - T1 Single Channel Wireless Data Logger
Required Materials
- Testo Saveris 2 - T1 Single Channel Wireless Data Logger
- Four AA batteries (included)
- Micro USB cable (included)
- A small screwdriver
- PC or tablet
- WIFI connection
Battery Installation
- Unscrew the rear battery compartment door.
- Install the included batteries (observing polarity).
- Replace the battery compartment door and screw it back into place.
- The device will automatically switch on and display temperature measurements and the battery status on the LCD screen.
Connecting the Data Logger to the Testo Saveris Cloud Platform
- Create a Testo Saveris Cloud account. Navigate to net and either select "New here? Register now!" or enter your details and login if you already have an account.
- To connect your first logger, insert one end of the included USB into the logger and plug the other end of the USB into your computer.
- Select the "
 " icon in the top right corner.
 - Once you have installed batteries, plugged in the logger, and the small power symbol is on the screen. Click NEXT.
- Enter your WIFI network name and password.
- Click NEXT.
- Right-click the file “WIFIConf_Dataen.xml” and save it to the Saveris 2 drive (the plugged in logger) on your computer.
- After the download is complete, disconnect your logger from the computer.
- Click NEXT.
- Check your logger to see if the WIFI and Cloud symbols display on the LCD (
 ).
). - When this is displayed, select FINISH SETUP.
- Your new logger will appear on the Testo dashboard.
- When the logger is first connected, there will be no data to display under "Last Value" or "last measurement." To force a reading, press the CONTROL button (
 ) on the front of the data logger to manually start a data transfer.
 - Refresh the page, and just like that, your logger is connected and transferring temperature information to the Testo Saveris cloud via WIFI.
Setting up Your Data Logger on the Testo Saveris Cloud Platform
- Begin on the main screen, DASHBOARD. To set up your logger, press the small arrow next to your logger to show more information.
- CLICK SHOW DETAILS.
- You will be redirected to the Testo Saveris logger configuration page. On this page, you can view and adjust the following;
- The WIFI connection status
- The logger’s remaining battery life
- The last collected value, along with the time and date
- Choose to deactivate the logger
- Edit the probe name and give it a description
- Input a measuring cycle interval: The basic (free) version is adjustable from 15 minutes to 24 hours. The advanced version is adjustable from 1 minute to 24 hours
- Set up a data transfer interval: This is how often the collected information is shared to the cloud. The transfer interval is selectable from 15 minutes to 24 hours using basic access and one minute to 24 hours using advanced access
- Switch Power Saving Mode ON or OFF. If ON, you can select a time frame for this to be activated
- Select the temperature readout between Celcius and Fahrenheit
- Switch the loggers display ON or OFF, view/select the battery type, and view the serial number and firmware version; and
- Delete the logger.
- After making changes to the Testo Saveris logger’s configuration, select SAVE CHANGES.
How to Set Temperature Alarms on the Testo Saveris 2 T1
- Select the ALARM tab on the dashboard.
- Click ALARM SETTINGS.
- Click NEW ALARM SETTING.
- Enter a title for the alarm.
- Select the Testo Saveris logger for this alarm to apply to using the checkbox.
- Click on the parameter (temperature) to expand the options. Next, input your required lower and upper limit alarm values.
- Turn ON or OFF alarms if the sensor becomes defective.
- Enter email addresses for the recipients of alarms.
- Select SAVE CHANGES.
How to Set System Warning Alarms on the Testo Saveris 2 T1
- To set up system warnings, go to ALARMS.
- Click SYSTEM WARNINGS.
- Select NEW SYSTEM WARNING.
- Switch ON or OFF the following warnings using the checkboxes; BATTERY ALMOST DISCHARGED, or POWER SUPPLY INTERRUPTED.
- Choose to turn ON or OFF an alarm activation if the WIFI logger is no longer responding. If activated, you can select a time interval using the sliding scale and set an alarm delay.
- Select the Testo Saveris data logger for this alarm to apply to using the checkbox.
- Enter email addresses for the recipients of alarms.
- Select SAVE CHANGES.
How to View and Acknowledge Alarms
- When you have activated and unacknowledged alarms, a notification will appear on the top of the Testo Saveris dashboard screen. The on-screen notification is a bell and the number of alarms, e.g.,
 .
. - To review the alarms, go to ALARMS
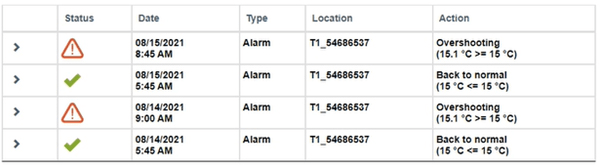
- Click ALARM LIST. You will be able to see the status, alarm date, type, location and action.
- Acknowledge alarms by selecting MARK AS READ. The alarm bell on the top will return to a green tick.

Conclusion
The Single-Channel Testo Saveris 2 - T1 Wireless Logger is an all-in-one and highly reliable logger for ambient temperature. Our scientists recommend this logger for long term ambient monitoring in buildings, warehouses, server rooms, and offices.
Need a hand with your Testo Saveris 2 - T1 Wireless Logger? Want more information on the Testo Saveris 2 series price? See the links below or contact an Instrument Choice Scientist!
Additional links
- View the Testo Saveris 2 - T1 Single channel wireless Data logger - IC-0572-2031
- Watch "How to Setup the Testo Saveris 2 - T1 Single Channel Wireless Data Logger" again
- Want to see what comes in the box? Watch an Instrument Choice Scientist “Unboxing the Testo Saveris 2 - T1 Single Channel Wireless Data Logger”
- For more information on the Testo Saveris 2 range, read "Product Review: Testo Saveris 2 WIFI Data Logger Systems."
- View all Testo Saveris 2 loggers and price:
- Testo Saveris 2 - T1 Single Channel Wireless Data Logger - IC-0572-2031
- Testo Saveris 2-T2 - WiFi data logger with two external NTC temperature probe connectors
- Testo Saveris 2-T3 - WiFi data logger with display and two connections for TC temperature probes
- Testo Saveris 2-H1 - WiFi temperature and humidity data logger
- H2 External Probe Humidity Data Logger
- Testo 160 IAQ Data Logger - IC-0572 2014
Also interesting
pH testers are among the most popular pieces of scientific equipment and have innumerable uses, from testing soil pH in home gardens to complex laboratory research.
This article answers seven of the most commonly asked questions about pH testers to help you make accurate, informed pH measurements.
View the 7 most commonly asked questions (and answers!) about pH testers

The Instrument Choice Team of Scientists regularly reviews new and popular products, so you can make more informed decisions when searching for the perfect scientific instrument for your application.
This edition assesses the Vortex-Genie 2 Vortex Mixer, a variable speed shaker, mixer and vortexer suitable for everyday laboratory use.
Get our scientists review of the Vortex-Genie 2 Vortex Mixer
