How to Take a Soil Moisture Measurement Using the PMS-714 Soil Moisture Meter

The PMS-714 offers a quick and easy approach to measuring soil moisture in most soil types. With a host of helpful functions, an easy-to-navigate interface and a rugged 20cm soil moisture probe, this soil moisture sensor is a perfect tool for taking accurate soil moisture measurements at varying depths.
Figure 1 Watch an Instrument Choice scientist demonstrate how to take a soil moisture measurement using the PMS-714 Soil Moisture Meter here.
How To Take A Measurement
Installing The Sensor
The PMS-714 Soil Moisture Meter comes in a carry kit with the following items;
- The PMS-714 soil moisture sensor
- Sensor reader display
- Sensor collar
- A rubber O-ring; and
- Four AAA batteries.
To get started, install the soil moisture sensor onto the sensor reader display. To do this;
- Install the O-ring on the top of the sensor.
- Place the collar on top of the sensor.
- Plug the sensor into the sensor reader. A track on the sensor will line up with a channel on the sensor reader display. Do not force the sensor.
- Twist the collar to tighten and secure into place.
Installing The Batteries
- Twist open the main battery compartment cover on the top of the sensor.
- Flip open the secondary battery compartment cover.
- Install the four AAA batteries, observing polarity.
- Flip the secondary battery door back on top of the batteries. The battery door cover will sit loosely above the batteries. The main compartment lid will secure it.
- Replace the main battery compartment lid and screw until tight.
- Press POWER to switch on the unit.
How To Take A Measurement
Taking A Measurement
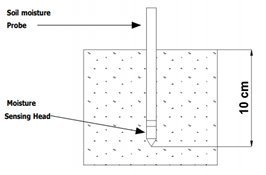
- To take a measurement, insert the moisture sensing head into the soil to be measured. The soil moisture sensor must be inserted at least 10cm into the soil, which exactly is half the length of the soil probe.
|
Scientists’ Note: If the sample soil under testing has a high moisture content, it may take a few minutes to obtain a stable reading. In this case, leave the sensor in place until the measurement becomes stable. |
Data Hold
You can freeze the measured soil moisture value on the LCD at any time for easy recording of results. The hold function is beneficial when measuring in hard to reach places. To HOLD a measurement;
- Take a soil moisture measurement by inserting the sensor into the soil.
- Press HOLD.
- The current measurement and HOLD will appear on the LCD. Remove the soil moisture sensor from the soil, and the measured value will remain.
- Press HOLD a second time to release the device from HOLD mode. Then, you can resume taking soil moisture measurements.
Data Recording
The PMS-714 can record data for later recall as MAXIMUM and MINIMUM soil moisture values. To save data for later recall;
- Take a soil moisture measurement by inserting the sensor into the soil.
- Press REC to record data. REC will appear on the LCD.
- Continue taking soil moisture measurements. The minimum and maximum values are being tracked and stored in the device memory.
- To view collected MIN/MAX data;
- Press the REC button while REC is visible on the screen. REC MAX and the maximum recorded reading will display.
- Press the REC button while REC MAX is visible on the screen. REC MIN and the minimum recorded reading will display.
- To delete MIN/MAX values: When the display shows either REC MAX or REC MIN, press the HOLD button momentarily to delete the value. Then, the display will show the REC and restart the recording of minimum and maximum soil moisture values.
- To exit the memory record function, press the REC button for 2 seconds. After that, REC will no longer be on the LCD. Instead, the display will return to measurement mode.
Conclusion
The practical and heavy-duty PMS-714 is brimming with useful functions such as data record and data hold. These valuable functions paired with the PMS-714’s high level of accuracy makes this device the soil moisture sensor of choice for numerous applications such as; home use, farming, landscaping and education.
Need assistance operating your PMS-714 soil moisture sensor? See the links below or contact us!
Additional links
- View the PMS-714 Soil Moisture Meter
- Browse all Soil Moisture Meters
- Watch “How to Take a Soil Moisture Measurement Using the PMS-714 Soil Moisture Meter”
- Want to see what comes in the box? Watch a scientist “Unboxing the PMS-714 Soil Moisture Meter”.

Also interesting
Spring is on the horizon – in only 33 days, but who’s counting?
Now is the ideal time to begin planning and putting your mind to your garden. What do you want to plant, where to place new varieties, when is the right time?
Because your soil pH meter is a fantastic tool to help you make those important decisions, our scientists have created some helpful tips to get your soil pH meter working perfectly in readiness for the planting season.
Don’t wait - learn how to prepare your soil pH tester for Spring here

The professional-grade IC-QM1598 Sound Level Meter comes with all the tools required to perform accurate environmental sound level measurements. This article shows you how to perform a calibration using the included sound calibrator to ensure your meter is performing to the highest level of accuracy.
Get our scientists’ how-to guide to calibrating the Pro Sound Level Meter (IC-QM1598) here.
