How to Use the Agreto GFM+ Grain Moisture Sensor (IC-FA08125-PLUS)

The reliable Agreto GFM+ Grain Moisture Sensor measures 42 types of grain, corn, oil, and protein crops with a touch of a button. Our team of scientists summarises this moisture sensor as; “straightforward, sophisticated and packed with all the features and functions required to perform accurate grain moisture measurements on the go.”
Figure 1 Watch an Instrument Choice Scientist demonstrate how to take a grain moisture measurement using the Agreto GFM+ Grain Moisture Sensor.
How to Use the Agreto GFM+ Grain Moisture Sensor (IC-FA08125-PLUS)
How to Take a Measurement
Always take three successive readings of the total sample being tested and average the results to enhance accuracy. Empty and refill the tester with new grain from the sample between each test.
- Press the POWER key to switch on the meter. The device displays PROPERTY OF: momentarily before automatically moving onto the grain menu.
- Remove the cap and inspect the test cell to ensure it is clean and empty.
- Navigate to the grain to be tested by pressing the UP or DOWN buttons.
- Fill the test cell to the top of the cell with the sample to be tested. If needed, use your finger to level grain and remove excess from the test cell.
- Replace the cap and tighten until the pressure-indicator screw is flush with the top of the cap.
❌
✔
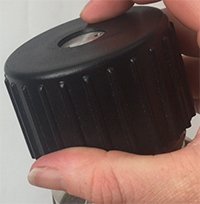
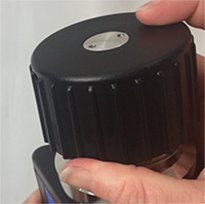
Image 1: Pressure-indicator screw not flush with the cap
Image 2: Pressure-indicator screw flush with cap
- Immediately press the ENTER button. The words TESTING and the selected grain will appear on the LCD briefly as the grain is measured.
- On the results screen, you will see the;
- Selected grain
- Measured value
- Offset
- Temperature; and
- The average value. The number in brackets is the number of tests averaged.

- To take another measurement, empty the test cell, refill with a fresh grain sample, tighten the cap, and press ENTER.
- The measured value will be automatically added to your average value calculation. The default number of tests to be averaged is the last three tests. You can change this default value in the settings.
Device Settings
The device settings mode allows you to customise meter preferences and defaults.
- Return to the grain selection menu (main screen).
- Use the UP or DOWN arrow to navigate to the OPTIONS selection.
- Press ENTER.
Clear Averages
- In the OPTIONS menu, use the arrow keys until the CLEAR AVERAGE is highlighted.
- Press ENTER.
- You have the option to clear the average for the CURRENT GRAIN selected or for ALL GRAINS within the unit. Use the UP and DOWN arrows to highlight your selection and press ENTER to confirm.
- Once selected, the moisture sensor will automatically return to the OPTIONS menu.
Total Values in Average Calculation
- The following settings option is # TO AVERAGE. Use the arrow keys to adjust until # TO AVERAGE is highlighted.
- Press ENTER to navigate into this submenu.
- The device can automatically average 3, 6 or 9 tests. To change the number of averages, use the UP or DOWN arrow keys to navigate until you reach your required value.
- Press ENTER when the desired value is highlighted.
- Once selected, the moisture sensor will automatically return to the OPTIONS menu.
Language
- Use the arrow keys until LANGUAGE is highlighted.
- Press ENTER to view the options.
- Use the UP and DOWN arrows to select a language.
- Press ENTER to confirm.
- Once selected, the moisture sensor will automatically return to the OPTIONS menu.
Temperature
- Use the arrow keys until TEMPERATURE is highlighted.
- Press ENTER to confirm.
- Use the arrow keys to choose the temperature display between CELCIUS or FAHRENHEIT.
- Press ENTER to confirm.
- Once selected, the moisture sensor will automatically return to the OPTIONS menu.
Auto-Shutoff time
- Use the arrow keys until AUTO SHUTOFF is highlighted.
- Press ENTER to view options.
- Use the UP and DOWN arrow keys to choose an automatic switch-off time between 30 seconds, 1 minute and 5 minutes.
- When your selection is highlighted, press ENTER to confirm.
- Once selected, the moisture sensor will automatically return to the OPTIONS menu.
Software Version Number
- The next option is VERSION.
- Press ENTER when VERSION is highlighted to view the current software version. The software version will be displayed for a few seconds before automatically returning to the OPTIONS menu.
Backlight
- Use the arrow keys to highlight BACKLIGHT. Press ENTER to view options.
- Use the navigation keys to switch the device backlight ON or OFF
- When your selection is highlighted, press ENTER to confirm.
- Once selected, the moisture sensor will automatically return to the OPTIONS menu.
Font Size
- Use the UP and DOWN keys to highlight FONT SIZE.
- Press ENTER to view options.
- Choose between the STANDARD font size or LARGE font size
- Use the UP and DOWN keys to highlight your selection and press ENTER to confirm.
- Once selected, the moisture sensor will automatically return to the OPTIONS menu.
Contrast
- Use the UP and DOWN keys to highlight CONTRAST.
- Press ENTER to view options.
- Under the CONTRAST submenu, you can use the UP and DOWN arrow keys to adjust the screen contrast. The screen's contrast will adapt with each button press.
- When the desired contrast is displayed, press ENTER to confirm. The moisture sensor will automatically return to the OPTIONS menu.
Calibration
Before entering a calibration offset, you should always obtain three test results from a grain elevator moisture tester for the sample being compared. Average these three results and compare the elevator’s average with the average result from your GFM+ grain moisture sensor. Each grain’s scale can be individually adjusted up to a total of 5% in increments of 0.1%.
- If a calibration is required, use the UP and DOWN arrow keys to navigate to and highlight CALIBRATION.
- Press ENTER to view options.
- Use the UP and DOWN arrow keys to make calibration adjustments in 0.1% increments.
- To change the grain type, use the FORWARD arrow to toggle through the list of grains.
- When you have input your adjustment, press ENTER to confirm and save.
- To exit without making any adjustments, press the BACK arrow to leave the calibration menu.
Conclusion
The Agreto GFM+ Grain Moisture Sensor is a robust and easy-to-use grain moisture sensor with the features and functions you could ever need to perform on-the-go grain moisture measurements.
If you need a hand taking a measurement or setting up your Agreto GFM+ Grain Moisture Sensor, see the links below or contact an Instrument Choice Scientist!
Additional links
- View the Agreto GFM+ Grain Moisture Sensor (IC-FA08125-PLUS)
- Browse all grain and hay moisture sensors at Instrument Choice
- Watch “How to Use the Agreto GFM+ Grain Moisture Sensor (IC-FA08125-PLUS)” again.
- Want to see what comes in the box? Watch a scientist Unboxing the AGRETO GFM+ Grain Moisture Sensor - IC-FA08125-PLUS
Also interesting
The Shore A Digital Durometer is a palm-sized portable hardness tester suitable for measuring medium hardness materials such as rubber, plastic, leather, wax, and more. This article shows how straightforward it is to perform material hardness measurements using this tester.
Read more

Instrument Choice’s team of scientists regularly reviews new and popular products, so you can make more informed decisions when searching for the perfect scientific instrument for your application.
This edition reviews the HI9813-6, a feature-packed, multiparameter portable tester by Hanna Instruments, ideal for an assortment of agricultural, greenhouse and hydroponic applications.
Get a scientists’ review of the Hanna Instruments HI9813-6 Portable pH/EC/TDS/Temperature Meter
