How to Use the Atago PAL-SALT Digital Hand-held Pocket Salt Meter

The Atago PAL-SALT is a pocket-sized, digital salt meter designed for checking salt content within food products. It is also suitable for industrial applications, like testing the corrosion resistance of automobiles.
The Atago PAL-SALT is capable of rapidly and accurately measuring salt concentrations from 0.00 to 10.0% (g/100g). Our scientists have collaborated to make a comprehensive video to help new owners become acquainted with their Atago PAL-SALT. The video demonstrates how to perform a zero-setting, take a measurement (using a food sample), prepare a food sample dilution, and set an offset.
Figure 1 Watch an Instrument Choice Scientist operating the Atago PAL-SALT Digital Hand-held Pocket Salt Meter here.
How to Use the Atago PAL-SALT Digital Hand-held Pocket Salt Meter
Performing a Zero Setting
A zero setting, also known as a zero calibration, is a quick and easy task that will ensure your Atago PAL-SALT is performing accurately. Our scientists recommend you complete a zero setting daily before use.
- Clean the sensor and sample stage thoroughly. You can use mild soap.
- Rinse thoroughly with water, then completely dry the area using tissues.
- Once clean and dry, press the START button with nothing on the sensor.
- "---" will display as the device measures, shortly followed by the measurement result.
|
5. |
If the measurement is 0.00% |
If the device is reading above 0.00% |
 |
|
|
|
The instrument is zero-set correctly and is ready to perform salt % measurements. Press no keys. |
Press the ZERO key. 000 will blink on the screen twice and then remain. |
|
|
6. |
Zero setting is complete. |
|
How to Perform a Basic Measurement on the Atago PAL-SALT
For samples below 6% Brix and 10% salt, you can take measurements directly. For measuring more concentrated samples, see “How to Prepare a Sample Dilution” below.
- Apply at least 0.6 mL of your sample directly to the sample stage.
- Press START.
- Your measurement will be displayed within a matter of seconds.
How to Prepare a Sample Dilution
Samples of the following products will require a dilution to be prepared:
- Liquid condiments over 6% Brix, containing over 10% salt and high in non-salt components. E.g. Soy sauce and Worcester sauce.
- Pastes, e.g. Miso, mayonnaise, and tomato sauce.
- Solid foods, e.g. pickles, cheese or chips. You will need to mince and grind the sample for solid foods, then make a dilution as detailed below.
Materials
- Clean glass or beaker
- Pipette (or any appropriate tool for stirring and moving solution)
- Water
- Scale; and
- Your sample (for dilution).
Method
This example details how to make a 10% dilution.
- Put your glass onto the scale pan and press TARE.
- Add 10 grams of your sample.
- Add 90 grams of water.
- Stir until the sample is completely dissolved. Let the dilution sit for a minute.
- Apply at least 0.6mL of the dilution to the sensor of the Atago PAL-SALT.
- Press START.
- The dilution’s measured value will appear on the LCD. As we have made a 10 per cent dilution of the sample, the reading you see on the screen must be multiplied by the dilution factor of 10 to obtain your true measurement. See the calculation example below.
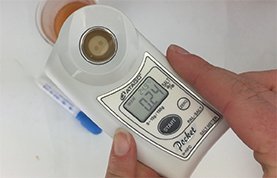
Figure 2 Measured value of 10% dilution displayed on the Atago PAL-SALT |
Dilution Calculation Example: The measured value of the dilution: 0.24 Dilution factor: 10 0.24 x 10 = 2.4%
The actual salt concentration within our measured sample is 2.4%. |
How to Set an Offset on the Atago PAL-SALT
Suppose you intend always to dilute your sample using this ratio. To improve your measuring efficiency, you can input a coefficient setting of 10, so your Atago salt meter will automatically multiply your measured sample by 10. To do this:
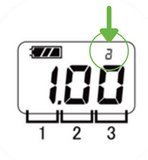
Figure 3 The "a" that appears on the
LCD of the Atago PAL-SALT
- Hold down the ZERO key with the device switched on for about 5 seconds. A small "-b" will appear on the LCD.
- Press START to move through the options until a small "a" appears on the LCD. Here is where you can enter your coefficient.
- To set it to 10 (that is, 10 x the measured value for a dilution factor of 10),
- press ZERO until 10.00 appears on the LCD.
- Press START to save.
- All the digits will flash to save the coefficient setting then END will appear on the LCD.
- Apply your diluted sample to the stage and press START to take a measurement.
- "OFS" and “---” will appear while the device is measuring – indicating the offset feature is in use.
- The measured value will display. As you can see in figure 4, image 2, this has automatically been multiplied by 10.
|
1. Without offset |
2. With offset |
|
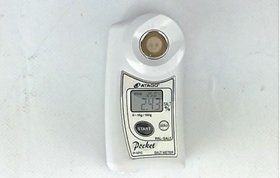 |
Figure 4 Measurement of a diluted sample with and without a coefficient of 10 applied on the Atago PAL-SALT
Conclusion
The Atago PAL-SALT salt meter is straightforward to navigate and ideal for use in the food industry. Thanks to dilutions and its offset functionality, it can measure a range of products with higher salt contents.
If you need more information or a hand with your Atago PAL-SALT, see the links below or contact an Instrument Choice Scientist!
Additional links
- Watch “How to Use the Atago PAL-SALT Digital Hand-held Pocket Salt Meter" again
- View the Atago PAL-SALT Digital Hand-held Pocket Salt Meter
- Browse all Atago Refractometers here
- Want to see what comes in the box? Watch an Instrument Choice Scientist "Unboxing the Atago PAL-SALT Digital Hand-held Pocket Salt Meter"
- The Atago PAL-SALT comes with an NFC data transmission function.
- Watch a scientist demonstrate how to use this function in the video: "How to use the Data Transmission Function on Atago Pocket Refractometers."
- Read How to use the Data Transmission Function on Atago Pocket Refractometers - Android Devices
Also interesting
The Instrument Choice Team of Scientists regularly reviews new and popular products, so you can make more informed decisions when searching for the perfect scientific instrument for your application.
This review covers Gallagher Tank Level Indicator Kits, a series of highly functional, accurate and versatile tank monitoring kits.
Get our experts’ review of Gallagher Tank Level Indicator Kits

Elitech is a producer of a range of accurate data loggers, renowned in food, logistics, manufacturing, pharmaceutical and scientific sectors for ease of use, accuracy and reliability. In this article, our scientists detail the Elitech Data Logger range and compare the differences between the available units.
Get our scientists’ guide to Elitech’s RC series of data logger
