How to Use the Concrete Moisture Encounter X5 (CMEX5)

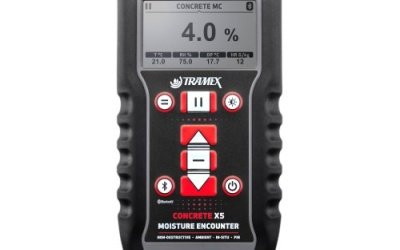
Using gravimetric testing as a baseline, the Tramex Concrete Moisture Encounter X5 is a precision non-destructive moisture meter that helps professionals instantly assess moisture levels in concrete floors and slabs.
Figure 1 Watch an Instrument Choice scientist demonstrate how to use the Tramex Concrete Moisture Encounter X5 here.
Features of the Tramex Concrete Moisture Encounter X5
|
A. Ambient relative humidity probe |
H. Menu button |
P. Non-destructive electrodes |
Setting Up the Tramex Concrete Moisture Encounter X5
The first step to set up your Tramex Concrete Moisture Encounter X5 is press the MENU BUTTON to find the main menu. There you will see five setup options.
Use the UP and DOWN selector keys to navigate each option. Press the ENTER key to confirm your selections or press MENU to return to the main menu.
1. Non-Destructive Testing (NDT) Mode
Here you can select a non-destructive testing scale that most closely represents the materials measured. Choose between:
- CONCRETE % MC scale: This metric is a quantitative percentage of moisture content by mass/weight readings that uses gravimetric testing as a baseline. Ideal for assessing concrete slabs and sand or cement screeds.
- CM CONCRETE scale: An equivalent reading to a Carbide Method (CM) test for concrete slabs and sand/cement screeds.
- CM ANHYDRITE: Equivalent reading to Carbide Method (CM) test for anhydrite, hemihydrate, gypsum and calcium sulphate screeds.
- GYPSUM REF 0-12: This is for reference readings replicating measurements using the concrete scale on concrete and sand/cement floors/screeds. Ideal for testing gypsum floors/screeds.
- REFERENCE 0-99 scale: A comparative/qualitative scale for identifying areas with moisture, where direct contact with bare concrete is not possible due to a thin coating or covering. Also great for non-concrete/ screed materials such as ceramic tiles or stone.
2. Pin Mode
If you have a PIN PROBE (sold separately), select a pin mode scale between:
- Recently used
- Wood Standard
- Wood Species
- WME; or
- Drywall.
3. Pin temperature
The wood probe (sold separately) is calibrated at 20°C. The effect of using this probe is as follows; at wood temperatures above 20°C, the meter readings are higher, and at wood temperatures below 20°C, the meter readings are lower.
Within the pin temperature screen, you can manually adjust the temperature to allow for the temperature calibration of pin readings. The manually compensated temperature value is visible on the measurement screen and will remain the same unless you update it. If you need to adjust the value, follow the following steps:
- Use the UP and DOWN keys to adjust the pin temperature value.
- Press ENTER to confirm.
4. Language
- Use the UP and DOWN keys to select a language.
- Press ENTER to confirm.
5. Temperature scale
- Use the UP and DOWN keys to select a temperature scale between Celcius and Fahrenheit.
- Press ENTER to confirm.
How to Take a Concrete Measurement Using the Tramex Concrete Moisture Encounter X5
taking a non-destructive measurement is quick and easy once you have set up your moisture meter in the main menu.
- From the main measurement screen, use the ENTER key to access the "shortcut" menu. Within the shortcut menu, you can choose a measurement scale that suits your application. Again, use the UP and DOWN keys to select and the ENTER key to confirm.
- Press your Tramex Concrete Encounter X5 meter onto the surface of the material you wish to measure, ensuring all the spring-loaded pins are entirely compressed.
- A steady moisture result will appear within seconds. When pressure is released, the measurement disappears.
- To keep the reading on the screen (for a straightforward recording of results), first, take a measurement, and while the reading is displayed, press the centre HOLD button. The reading will remain on the LCD, along with a small HOLD icon in the top corner of the LCD.
- Press the HOLD button a second time to release the meter from HOLD mode and resume measuring.
How to Connect the Tramex Concrete Moisture Encounter X5 to the Tramex Meters Application
- Download the Tramex Meters application (available for Android and Apple).
- Press CONTINUE.
- Read the introduction and terms and conditions. Press ACCEPT.
- For new accounts, enter your details and press REGISTER. If you already have an account, select SIGN IN TO YOUR ACCOUNT on the top of the screen.
- Accept any permissions.
- Ensure Bluetooth is switched on on your mobile.
- Press the BLUETOOTH key on your moisture meter. A Bluetooth icon will appear on the top left corner of the device’s LCD.
- Wait – the app will automatically search for and find Bluetooth-enabled Tramex devices.
- Press on the listed device to view all live information. Along the bottom of the screen, you’ll find further device information such as thermal conditions, psychometrics, and a list of over 500 wood species.
- The final step for the best use of the Tramex Cloud platform is to register your meter.
- Press on the meter icon in the app.
- Select TRAMEX CLOUD.
- Press on the device you wish to register. That’s it!
Conclusion
The Tramex Concrete Moisture Encounter X5 is a robust and easy-to-use moisture meter professionals use to assess the condition of concrete floors and slabs.
Need a hand with your Tramex Concrete Moisture Encounter X5? See the links below or contact us!
Additional links
- View the Tramex Concrete Moisture Encounter X5 (CMEX5)
- Watch "How to Use the Tramex Concrete Moisture Encounter X5 (CMEX5)"
- Want to see what comes in the box? Watch an Instrument Choice Scientist "Unboxing the Tramex Concrete Moisture Encounter X5 (CMEX5)"
- Get the Tramex App for Android devices
- Get the Tramex App for Apple devices
- Related accessories:
- Tramex Hammer-Action Pin-Type Electrode (For CMEX5)
- Tramex Hygro-i2 Electronic Interface Cable (for CMEX5 & DL-RHTX) - RHIE2B
- Tramex short Ambient RH Probe - RHP-SWB (for CMEX5)
- Tramex Hand-held Wood Pin Probe (for CMEX5) - HH14TP30B
- Tramex short Narrow RH Probe - RHP-SNWB (for CMEX5)
- Tramex Narrow Ambient RH Probe - RHP-NWB (for CMEX5)
- Learn how to keep your Tramex Concrete Moisture Encounter calibrated. Read "How to Check Calibration on your Tramex Moisture Meter"
You Might Also Like: Additional Tramex Moisture Meter Videos
Unboxing and Overview of the Moisture Encounter ME5
How To Use The Tramex ME5 Calibration Check Box (CALBOXME5)
How to Set Up and Use the CME5 Concrete Moisture Encounter
How to Measure Concrete Moisture Using the IC-CMEX2 Digital Concrete Moisture Meter
Unboxing the MRH3 Digital Non-Destructive Moisture Meter
How to Set Up and Take Measurements with the IC-MEP Moisture Meter
Also interesting
Borescope cameras are specially designed devices that relay a real-time visual image from inside machinery or in places difficult to reach. Unfortunately, the vast selection of borescope cameras for sale can make selecting the best device for your application a challenge. For this reason, our scientists have created a list of ten helpful tips to help you find the best borescope camera for your application.
Get our exclusive tips plus a selection of the best Boroscopes here

The Instrument Choice Team of Scientists regularly reviews new and popular products, so you can make more informed decisions when searching for the perfect scientific instrument for your application.
This edition examines the professional and functional FLIR E6-XT thermal camera, a featured-packed device designed for diagnosing electrical, HVAC and building issues.
Get the scientists’ review of the FLIR E6-XT Thermal Camera

