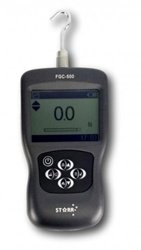
How To Use The IC-FGC-500 Digital Force Gauge

The IC-FGC-500 is a robust instrument that measures force - specifically tension and compression forces. Multiple measuring modes, user-selectable measuring units and a data logging capability make the IC-FGC-500 well-suited for various industrial applications.
Figure 1 Watch an Instrument Choice Scientist demonstrate how to use the IC-FGC-500 Digital Force Gauge here.

Figure 1 IC-FGC-500 Digital Force Gauge buttons
How To Use The IC-FGC-500 Digital Force Gauge
BUTTON FUNCTIONS
- POWER: Switches the unit on and off.
- ZERO/UP: On the measurement screen ZERO/UP returns the measurement to 0.0. Within the menu ZERO/UP is the up selection key.
- MENU/ENTER: When pressed on the measurement screen MENU/ENTER opens the main menu. When pressed within the main menu, MENU/ENTER selects the highlighted value.
- DOWN: DOWN is a navigator key within the menu.
- STORAGE/BACK: On the measurement screen pressing STORAGE/BACK saves the measured value into the device memory. Within the device menu, pressing STORAGE/BACK returns to the previous page.
SCREEN NAVIGATION

Figure 2 IC-FGC-500 Digital Force Gauge screen
- TEST MODE ICON: The icon of the employed test mode appears in the top left corner—icons described in figure 3 (below).

Figure 3 IC-FGC-500 test mode icons and meaning
- BATTERY STATUS: Amount of battery remaining.
- FORCE DIRECTION: Force direction is indicated between tension
 and compression
  .
. - MEASUREMENT: The current force measurement.
- TEST UNIT: Measurement test unit. Choose between Newton (N), kilogram-force (kgf), pound-force (lbf) or ounce-force (ozf).
- CAPACITY INDICATOR: Displays the current capacity in an easy to understand bar graph.
- DATA TRANSMISSION AND DATA STORAGE: Icons for data transmission
 and data storage
  will appear on the bottom left when applicable.
 - TIME: The system time.
INSTALLING THE MEASURING HEAD

- Select the most appropriate measuring head for your application. The options are:
- Hook
- Notched
- Conical
- Chisel
- Flat; and
- An extension rod.
- Mount it on the measuring adapter and twist it into place. Always tighten the measuring heads by hand. Never use a tool as it may damage the instrument.
- Switch the unit on, and the device is essentially ready to take measurements. Pushing or pulling on the measuring head changes the measurement display as well as the force direction indicator.
HOW TO SELECT MEASURING UNITS
- To adjust the measuring parameter, press the MENU/ENTER key to enter into the MENU.
- Select MEASUREMENT.
- Press the ENTER key to enter into the measurement submenu.
- Press MENU/ENTER again to select UNIT.
- Under the UNIT submenu, use the UP and DOWN selector key to choose a unit. You can choose between the unit display of;
- Newtons
- Kilograms-force
- Pound-force; or
- Ounce-force.
- When the unit you wish to use is highlighted, confirm your selection by pressing MENU/ENTER. The force gauge will return to the measurement submenu.
- The second option on this menu is the TEST MODE selection. Press the DOWN key until the TEST MODE is highlighted.
- Press MENU/ENTER to move into the TEST MODE submenu.
- Press the UP and DOWN keys to scroll through the three test mode options. The three test modes are:
- TRACK: This is the real-time measuring mode.
- PEAK: In peak mode, the maximum measured force will remain on the LCD. Press the ZERO key to return the unit to zero.
- PRESET: In preset mode, you can input the upper and lower tolerance limit for a measured force.
- When the mode you wish to use is highlighted, confirm your selection by pressing MENU/ENTER. The device will return to the measurement submenu.
- Press BACK twice to return to measurement mode. The digital force gauge is ready to perform measurements with your set conditions.
HOW TO SAVE A MEASUREMENT
You can choose to store measured values in the memory of the force gauge for later review or printing. To save a measurement;

- Press the STORAGE/BACK key in measurement mode. The small storage icon (see right) will display on the bottom left of your screen as you save your measurement. You can save up to 500 measurements.
Note: The data stored is whatever is displayed on the screen at the time of pressing STORAGE/BACK. When in TRACK and PRESET modes, the IC-FGC-500 saved is measured force. In the PEAK MORE mode – the highest recorded data value is saved.
HOW TO REVIEW SAVED DATA
- To review logged data, press the MENU/ENTER key to enter into the main menu.
- Press the UP or DOWN selector keys to highlight MEMORY.
- Press MENU/ENTER.
- There are three options in the MEMORY submenu. The first is BROWSE. Press MENU/ENTER to select. This step will bring up a list of all your saved measurements with a number, the force and the force direction.
- Use the UP and DOWN keys to move through each logged measurement.
- Pressing MENU/ENTER on any of the highlighted measurement brings up the option to DELETE or PRINT each measurement.
- Use the UP and DOWN keys to highlight and select either option and MENU/ENTER to confirm.
- To return to the MEMORY submenu, press BACK.
- The second option under the BROWSE submenu is PRINT. If your printer is connected, press MENU/ENTER to move into the PRINT submenu.
- The third option within the MEMORY submenu is DELETE ALL. Press this to clear the recorded memory.
- Press BACK to return to the MAIN MENU.
SYSTEM SETUP
Use the UP and DOWN selector keys to move between system setup options and adjust values. Press MENU/ENTER to select and confirm values.
- Press MENU/ENTER navigate into the main menu.
- Use the arrow keys to scroll down until SYSTEM is highlighted.
- Press MENU/ENTER to move into the SYSTEM setup submenu.
- There are seven adjustable options in the SYSTEM submenu.
- DISPLAY: There are two displays modes. These are obverse and reverse. Selecting reverse turns the screen upside down for easy measurement when the meter is in an upside-down position. The screen can be rotated at any time, depending on your requirements.
- AUTO POWER: When AUTO POWER is switched on, the meter will automatically switch off 5-minutes after the last button press to conserve battery life. If AUTO POWER is off, the device will remain on until manually switched off.
- BACKLIGHT: The force gauge features an LCD backlight for use in poor lighting conditions. Choose to turn the backlight ON or OFF.
- KEY SOUND: This will make the unit beep with each keypress. Choose to turn the key sound ON or OFF.
- DATE/TIME: Adjust the system date and time. Individually set the hour, minute, second, year, month and day.
- CALIBRATION: Calibration should only be performed if you have standard force weights or other standard sample loads available. Press MENU/ENTER to move into calibration mode and follow the prompts to perform calibration.
- DEFAULT: Under the DEFAULT menu, you can restore the force gauge to the original factory settings.
Conclusion
The IC-FGC-500 is a robust and easy-to-use force gauge for testing tension and compression forces.
For more information on the IC-FGC-500, see the links below or contact us!
Additional links
- View the IC-FGC-500 Digital Force Gauge - Basic 500N (50Kgf)
- Browse all Digital Force Gauges at Instrument Choice.
- Watch "How To Use The IC-FGC-500 Digital Force Gauge"
- Want to see what comes in the box? Watch an Instrument Choice Scientist “Unboxing the IC-FGC-500 Digital Force Gauge”.
Also interesting
The Instrument Choice Team of Scientists regularly reviews new and popular products, so when searching for the perfect scientific instrument for your application, you can make more informed decisions.
This edition reviews the TSI 9565, a precise and powerful multi-function ventilation meter.
Get your scientists’ review of the TSI 9565 VelociCalc Multi-Function Ventilation Meter

The HALO soil pH meter is an innovative new soil pH meter by Hanna Instruments. With an application-specific design for soil and wireless technology, the IC-HI12922 is a practical pH meter for laboratory and field-based soil pH measuring tasks.
This HALOmeter is a breeze to set up, and within minutes you can have pH data beamed directly to your smartphone or Edge Blue pH meter.
Learn how to take laboratory grade pH and temperature measurements using your smartphone or tablet.

