How Use And Export Data From The TDR Digital Soil Moisture Measurement Sensor (IC-RD1200)

The IC-RD1200 is a specialised TDR digital soil moisture measurement sensor and reader that offers you a simplified approach to measure volumetric water content, temperature, permittivity, conductivity, and pore water EC.
Figure 1 Watch an Instrument Choice Scientist demonstrate how to export data from the TDR Digital Soil Moisture Measurement Sensor here.
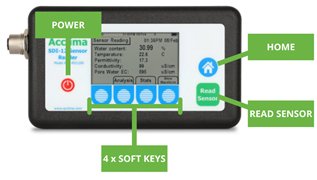
Figure 2 SDI-12 sensor buttons
Setting Up The TDR Digital Soil Moisture Measurement Sensor
Navigation of the handheld reader is performed via three fixed keys (POWER, HOME and READ SENSOR) and four softkeys. The soft keys adjust based on the in-use screen.
The main home screen has four soft keys. These are Radio GPS, Sensor, Settings and Data. Below, we detail how to set up each of these parameters. Note: you can press the HOME key to return to the main screen at any time.
RADIO GPS
- To set up the GPS, press the RADIO soft key while on the home measurement screen.
- A new screen will appear with one menu option above a soft key: GPS ON. Press the button below GPS ON to switch on the GPS.
IC TIP: Satellites will automatically
update your reader’s system time
and it may be incorrect.Check the time of your device
before use. You may need to
adjust time settings manually
after connecting to GPS. - Once on, you will see a stop-watch counter run as the reader synchronises with GPS satellites overhead. It usually takes 10 - 15 seconds to sync up GPS and acquire the signal. However, this may take longer depending on your geographic location and other factors such as dense cloud cover or obstructions.
- Once the reader has synced up with the GPS satellite system, you will see the GPS coordinates and an estimated accuracy (given in meters) on the LCD.
- When GPS is switched on, you will see that the soft key below has changed to GPS off. Switch the GPS off at any time by pressing this button.
- Press the HOME key to return to the main measurement screen.
SENSOR
- To ensure that your sensor is correctly connected to the reader, press the SENSOR button on the HOME screen.
- A new screen with additional soft key options will display. Press the DETECT button.
- An address, model, and the serial number of the soil moisture sensor will be detected and show on the screen, indicating the sensor is connected correctly.
- Press the HOME key to return to the main measurement screen.
SETTINGS
- Press the SETTINGS soft key to enter a general settings submenu.
- Four new options will appear above the soft keys.
- BEEP: Pressing BEEP enters a new screen with two new soft key options. These are:
- VOL: Each press of the VOL key adjusts the key beep volume between three settings of low, high and off.
- MODE: Each press of the MODE key changes the sound mode from; button press, reading, button and reading and none/mute.
- SLEEP: Each press of the SLEEP key adjusts the automatic off timer on the screen.
- 24/24hr: Each press of the 12/24hr soft key toggles the display between 12 and 24 hour time
- SET TIME: Pressing opens an additional page to set the time zone and daylight savings time manually.
- The first two keys adjust the UTC offset up and down by 1:00. The third key adjusts DST up in 0:15 increments and allows you to switch DST on or off.
- Press the HOME key to return to the main measurement screen.
- BEEP: Pressing BEEP enters a new screen with two new soft key options. These are:
DATA
- Pressing the DATA soft key opens the data submenu.
- This menu provides you with the memory usage information (memory must be at least 1% for data to appear) and the current output selection. In addition, four key softkeys will appear within the DATA menu.
- TAG: TAG gives you the option to group your readings with a specified identification number. Use the centre keys to increase or decrease the value.
- DATA OUTPUT: This option lets you select preferred data output. Each press of the button toggles through the options of; CSV only, CSV and binary, or just binary.
- ERASE LOGS: Pressing the ERASE LOGS soft key button allows you to erase all logged data. Before erasing data, you will be required to confirm by further pressing a 'YES' or 'NO' soft key.
- ERASE ALL: Similarly, the 'Erase All' enables you to erase all log and configuration data. Again you will need to confirm by further pressing a 'YES' or 'NO' soft key.
- Press the HOME key to return to the main measurement screen.
Taking A Measurement Up The TDR Digital Soil Moisture Measurement Sensor
TAKING A MEASUREMENT
- Insert the TDR sensor into the soil or substrate to be measured.
- Press the READ SENSOR button.
- Within a matter of seconds, a reading will appear. The screen will display the measured water content, temperature, permittivity, conductivity, and pore water EC readings.
- Within the sensor reading screen, three new options appear above the soft keys. These are; ANALYSIS, STATS and SHOW WAVEFORM. After reviewing the data within these softkeys, press SHOW READING to return to the main READ SENSOR page.
- ANALYSIS: If you press the ANALYSIS button, you will be presented with the 'Reading Analysis' screen. This option is useful for indicating the fill level of the soil's field capacity (FC). Here, you can see the following metrics; water content, water fill level, water needed to refill, refill depth/rod length. Note: thresholds must be set depending on soil type (See ADJUSTING THRESHOLDS below).
- STATS: This displays statistics of all your collected parameters, including the last reading, average, maximum, and the minimum, as well as the total number of readings listed above. To disregard previous readings and begin a new set, press the CLEAR soft key.
- WAVEFORM: Pressing the SHOW WAVEFORM generates a waveform of the latest reading within about five seconds.
ADJUSTING THRESHOLDS
When your soil type is selected, the device automatically sets an approximate field capacity (FC), managed allowable depletion (MAD), and the range between the MAD and FC. The field capacity and managed allowable depletion settings can be manually overridden and edited by pressing each respective CHANGE button.
- Begin measuring by pressing READ SENSOR.
- When the readings appear on the screen, press the ANALYSIS soft key.
- Press the THRESHOLDS soft key.
- Three additional soft keys appear. These are; CHANGE ST (soil type), CHANGE FC (field capacity) and CHANGE MAD (managed allowable depletion).
- Pressing CHANGE ST brings up the available soil type calibrations. Press the two centre soft keys to scroll through the options.
- When your soil type is highlighted, press the SELECT soft key to save. The field capacity and managed allowable depletion will automatically update. If these values are suitable – skip to Step #13.
- To manually adjust the calculated field capacity, press “CHANGE FC”.
- Use the first two soft keys to adjust the field capacity in increments of +1 and -1, respectively. Next, press the third soft key to adjust in +0.1 increments.
- When your required field capacity is displayed, press the DONE soft key to save the adjusted value.
- To manually override the calculated managed allowable depletion, press “CHANGE MAD”.
- Use the first two soft keys to adjust the field capacity in increments of +1 and -1. Press the third key to adjust in +0.1 increments.
- When your required managed allowable depletion value is displayed, press the DONE soft key to save the adjusted value.
- Press DONE again to exit the threshold menu
- The device will return to the READING ANALYSIS page
- Press SHOW READING to return to the most recent reading or the HOME button to return to the home screen.
Exporting Data
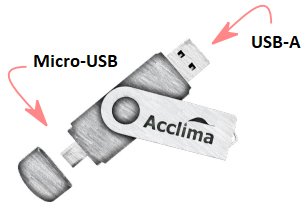
Figure 3 Included Acclima USB thumb drive
SENSOR TO USB THUMB DRIVE
- Remove the cap and insert the micro-USB on the included thumb drive into the port on the side of the handheld reader. Do not disconnect the thumb drive until the reader’s LCD indicates that synchronisation is complete.
- A notification will appear on the LCD when synchronisation is complete. When this appears, the USB can be removed from the sensor. Replace the micro-USB cap.
- Remove the cover of the other side covering the USB-A and insert it into a port on your computer. There are two ways you can open your information. First, open via the Acclima Readerview or open as a Microsoft Excel file.
VIEW DATA USING ACCLIMA READERVIEW
- Insert the USB into your computer and open the “Acclima ReaderView” software, which can be found on the thumb drive.
- Select “OPEN MEASURE CSV FILE” on the Acclima ReaderView software.
- Search for the USB drive on your computer, open the file named “Acclima.”
- Open the file named “RD1200”.
- Open the file named “Data”.
- Open the file Measure_ (DEVICE’S SERIAL NUMBER) with the most recent date.
- Your data will appear in the Acclima read software.
VIEW DATA IN AN EXCEL FILE
- Search for the USB drive on your computer, open the file named “Acclima.”
- Open the file named “RD1200”.
- Open the file named “Data”.
- Double click to open the file “Measure_ (DEVICE’s SERIAL NUMBER)” with the most recent date. This action will open the data in an excel file.
- The second excel file labelled WAVEFORM has all the same information plus waveform time in picoseconds.
- Once either file is open in excel, you can share, save and graph your soil moisture and nutrient content information.
Conclusion
The IC-RD1200 is a specialised TDR Soil Moisture Measurement Sensor designed and recommended for professional use.
For more information on the IC-RD1200 Soil Moisture Measurement Sensor, see the links below or contact us!
Additional links
- View the IC-RD1200 TDR Soil Moisture Measurement Sensor here
- Discover all Soil Moisture Measurement Sensors at Instrument Choice
- Watch “How Use And Export Data From The TDR Digital Soil Moisture Measurement Sensor (IC-RD1200)”
- Want to see what comes with the IC-RD1200 TDR Soil Moisture Measurement Sensor? Watch an Instrument Choice Scientist “Unboxing the IC-RD1200 TDR Soil Moisture Measurement Sensor”
Also interesting
The Loggerflex Bun range of smart, wireless WiFi data loggers is renowned for ease of use, reliable SMS and email alarms, an intuitive web platform and extraordinarily long battery life.
This article demonstrates how to set up your bun Thermo WIFI Temperature Monitor – an excellent monitor and recorder of temperature for general monitoring applications such as:
- Home and retail store fridges/freezes
- Room temperature in homes and offices; and
- Storage facilities.
Ensure you never miss an alarm again - learn how to correctly set up a bun Thermo WIFI Temperature Monitor so you can keep an eye on your temperature-sensitive environment.

The BRM-100 is a sugar level refractometer that measures Brix from 0 to 32% in various food and beverage products like fruits, vegetables, juices, wine, soft drinks and sugar-containing non-food products like synthetic coolants.
Battery-free, portable and highly accurate (thanks to included temperature compensation), the IC-BRM-100 is the most popular choice for many Instrument Choice customers requiring quick, reliable Brix results on the go.
Learn how to calibrate and take a sugar level measurement with the IC-BRM-100 here
